Getting Started with DigitalSuite Studio
DigitalSuite Studio is the powerful low-code development, management, and monitoring environment of RunMyProcess DigitalSuite. It includes all the tools and modules required to:
- Manage accounts, organizations, users, and roles.
- Set up projects and model and implement processes, interfaces, and reports.
- Integrate systems and devices by means of connectors.
- Monitor operation including usage, schedules, and logs.
DigitalSuite Studio provides an outstanding user experience through a modern interface based on state-of-the-art web technologies.
Starting Up
You can access DigitalSuite Studio in one of the following ways:
- In your browser, open the DigitalSuite URL, https://digitalsuite.runmyprocess.com, and log in.
- In your browser, log in to the DigitalSuite portal, https://portal.runmyprocess.com, and open DigitalSuite Studio from your personal homepage.
From the DigitalSuite Studio Welcome screen, you can proceed to any of the available modules:
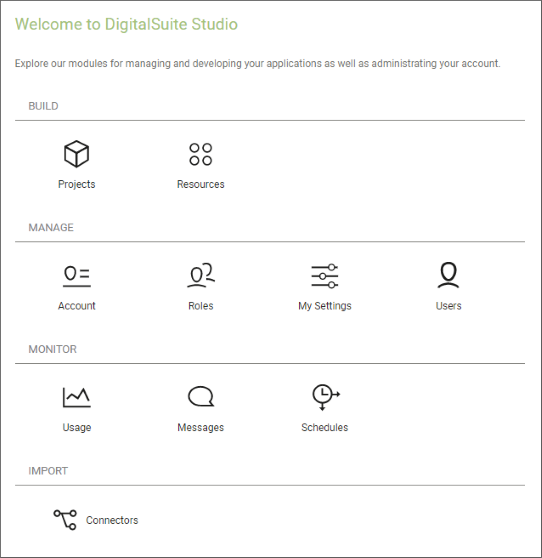
Navigation
To navigate your way around DigitalSuite Studio, each module provides a navigation icon in the top, left-hand corner:

Clicking this icon activates the navigation tool:
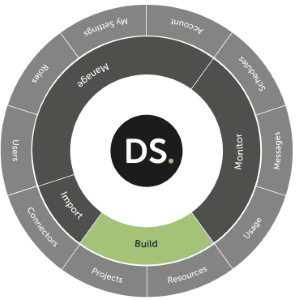
The available modules are arranged on the outer circle of the navigation tool, categorized into Manage, Import, Build, and Monitor. To open a module, just click it.
Clicking the inner circle takes you to the DigitalSuite Studio Welcome screen, which displays the modules in a more traditional way.
You can also reach the Welcome screen by clicking the DigitalSuite Studio icon in the top, left-hand corner of each module:
![]()
On-Screen Help
Each module of DigitalSuite Studio comes with in-built help, meaning that help is available at the point where it is needed. As a result, separate documentation has been kept to a minimum.
To enable or disable the on-screen help, click the Toggle on-screen help icon that can be found in the top, right-hand corner of each module.
![]()
Additional Support
DigitalSuite provides you with a variety of options to obtain support and answers to your questions, if needed.
You can access these options from each module of DigitalSuite Studio using the Support icon in the top, right-hand corner:
![]()
Details of the individual options are described here