Dropbox integration using OAuth 2.0 authentication
Like many web services, Dropbox API allows its clients to use OAuth 2.0 as an authentication method. Let's dive in a tutorial on how to authenticate yourself to Dropbox to make your user Dropbox account accessible from your processes, and leverage the tools provided by the RunMyProcess platform to manage easily your OAuth 2.0 credentials.
Since OAuth 2.0 is a standard now, you will be able to use the techniques described in this tutorial to access many other OAuth 2.0 compatible web services (Google, Microsoft, ...).
Setting up your Dropbox application
The first step to be able to access the Dropbox API using OAuth 2.0 is to register your application to Dropbox, that will allow you to get some id, passwords (secrets) and other information (called credentials in this document) needed to create tokens that will be used to eventually access the API. These credentials should be stored in a secure environment (for example your project vault, more on that later). The tokens created using these credentials are unique for each user accessing the API and should also be kept in a secure place, like the OAuth service tokens store, another service provided by the platform.
To create your new Dropbox application, please go to the Dropbox developer app console, and click the Create app button, then fill in the required information.
When your app is created, you are able to access its information page, where you can get your app key and app secret, and set your OAuth 2.0 redirect URIs, but before using that we need to create a couple of web interfaces in our Dropbox RunMyProcess project.

Setting up your RunMyProcess application
If needed, create a new project, that will host our web interfaces, processes and composite APIs used to access our Dropbox files. The first web interface will be used to ask a user of your application to authorize your Dropbox application to access their Dropbox, basically it is used to redirect the user to the Dropbox authorize page, passing some useful parameters. When this redirection is done, the user is presented an authorize page, hosted by Dropbox, showing them the name of the application that is asking for the access, and the rights/permissions that this application is asking for, something like :
Application Your Great Application wants to have access to all your Dropbox files, do you agree ?.
If the user agrees to this, Dropbox will redirect them to the specified redirect URI (a parameter sent by the first web interface during the first redirect), this URI points to the second web interface that we will have to design. This second web interface will be called with some codes, that we will have to convert to some access token and then store these tokens to access the Dropbox API later on. And yes, this redirect URI must be in the configured redirect URIs list in your Dropbox project app console configuration page.
Well OAuth 2.0 may seem a little bit complex at first sight, but everything will be clear when all our resources are up and running.
To make things even simpler, we will need the URL of the second web interface, in the first web interface, and in the Dropbox app console, so we will start by designing this second interface first.
Web interface callback and associated composite API
This web interface will be called by Dropbox after the user has authorized our Dropbox application to access their files. The access token will be generated by using a code that is provided in the query string of the callback URL, and we will have to store this token in the OAuth service store of the user. We can do that by calling a composite API, from the web interface. To convert the returned code to an access token, we will need to send a request to Dropbox OAuth 2.0 API, to do that, let's create a new connector:
- From your project home page, create a new web service provider by clicking the
New Providerbutton, name itDropbox OAuthfor example, - Set the URL for each mode to : https://
api.dropbox.com/1/oauth2/ - Set the
Authentication schemefor each mode to :Login / Password - Set the
Loginfield for each mode to your application key, found in the developer app console - Set the
Passwordfield for each mode to your application secret, found in the developer app console

- Save the provider, and click on the
Add Connectorbutton - Set the name of the connector to
Dropbox OAuth Tokenfor example - Set the connector URL to :
token?code=${authorization_code}&grant_type=authorization_code&redirect_uri=yourCallbackUrl. You will need to come back to replace theyourCallbackUrlplaceholder with your own callback URL, that we will get in a few steps. - Set the
Method,Result format,Accept media typeandContent-typeas shown in the screenshot below:

Now let's create the CAPI:
- From your project home page, create a new composite API by clicking the
New Composite API, name this CAPIDropbox OAuth Token Registrationfor example, - Make sure to set the
Accept media type,Input validation,Result media typeandResult transformationfields of theConfigurationtab as shown in the screenshot below :
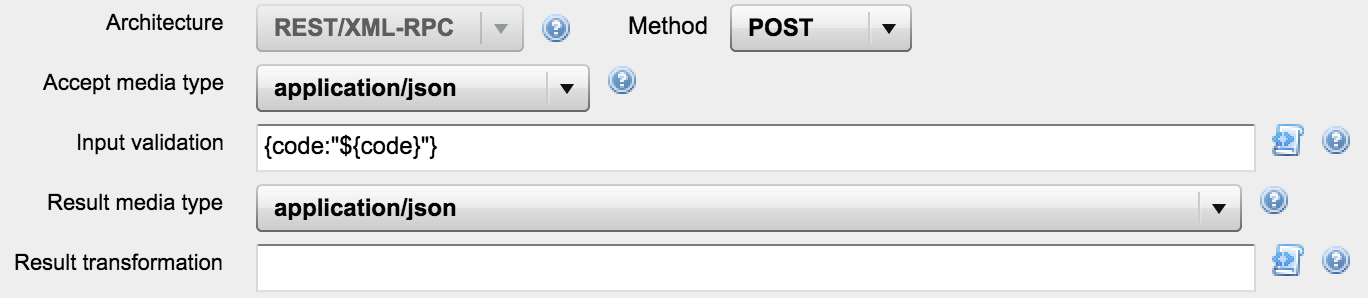
Here we have created a new CAPI, that will be called using a POST method, its expecting a JSON object in the request body, with one field: code .
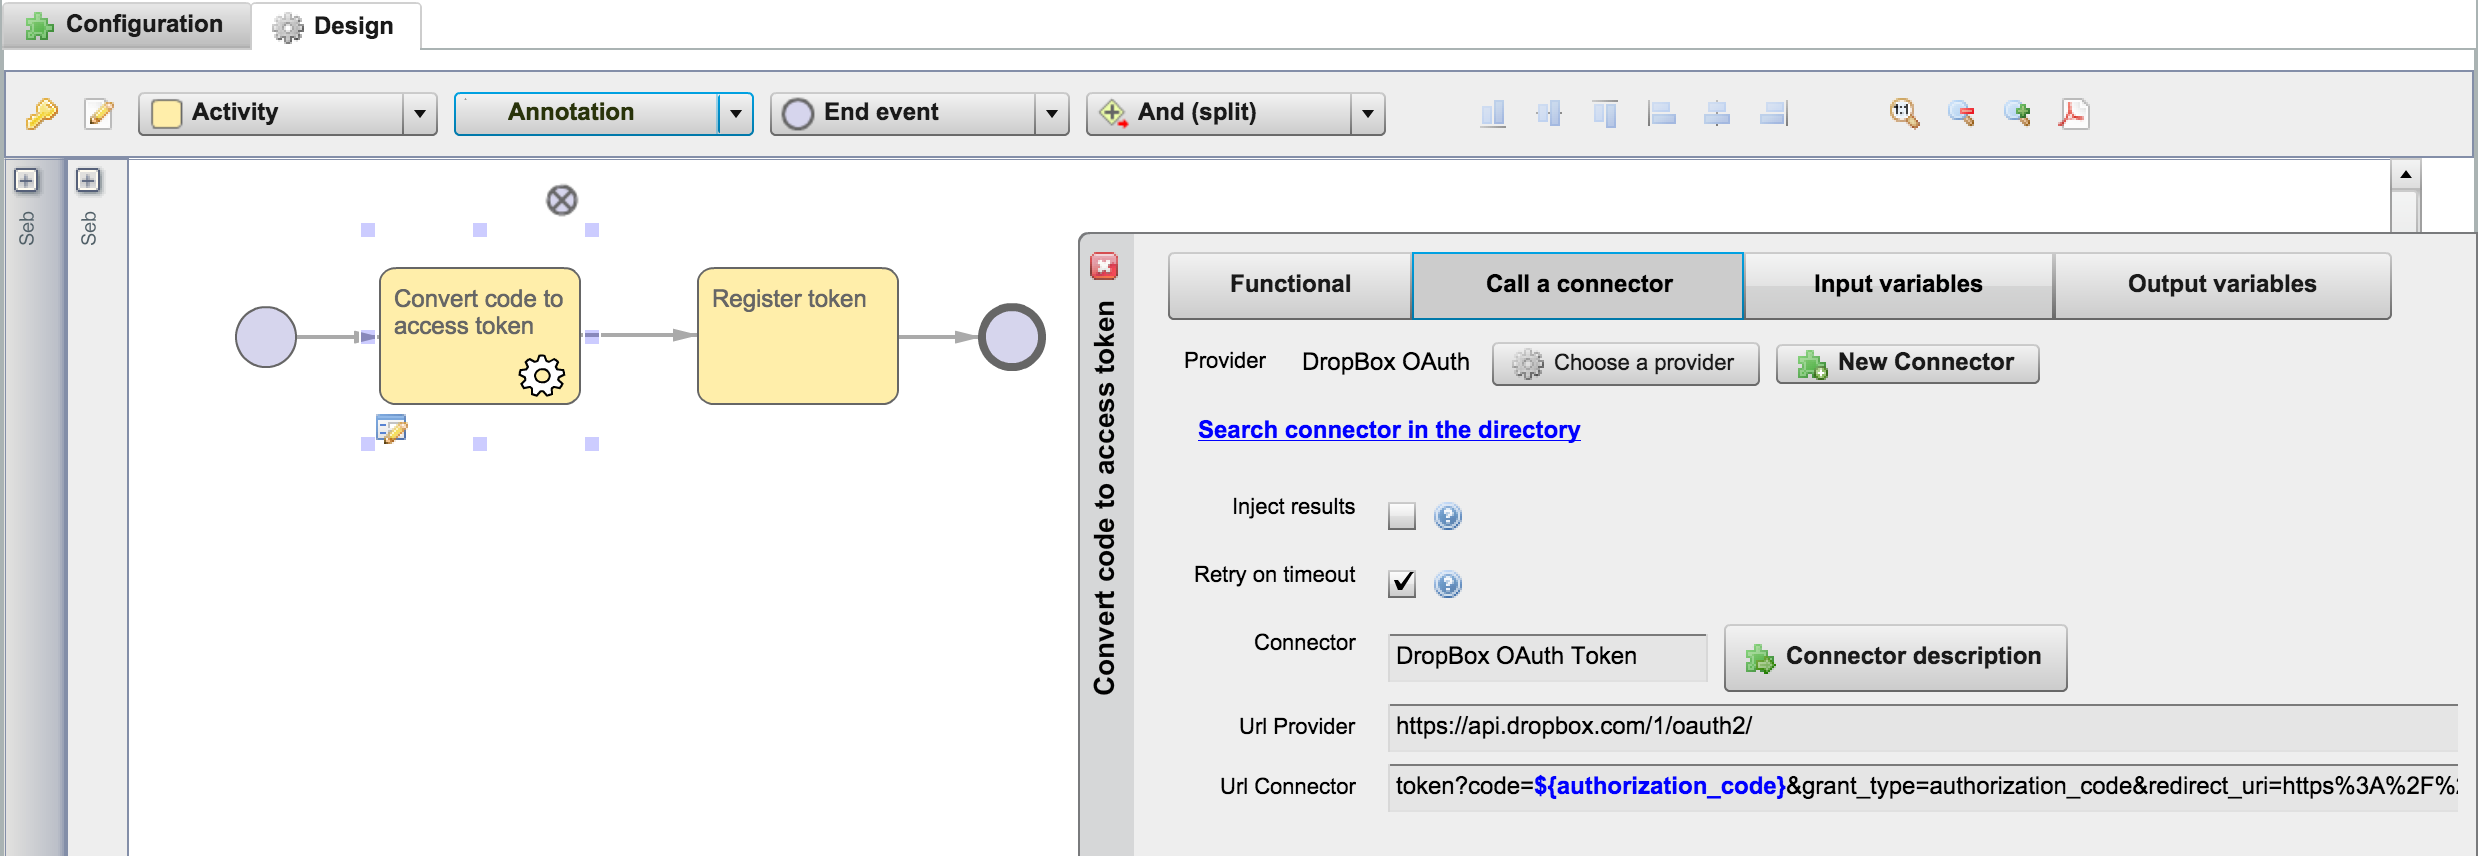
- It will have two tasks, the first one will have the connector Dropbox OAuth Token associated:
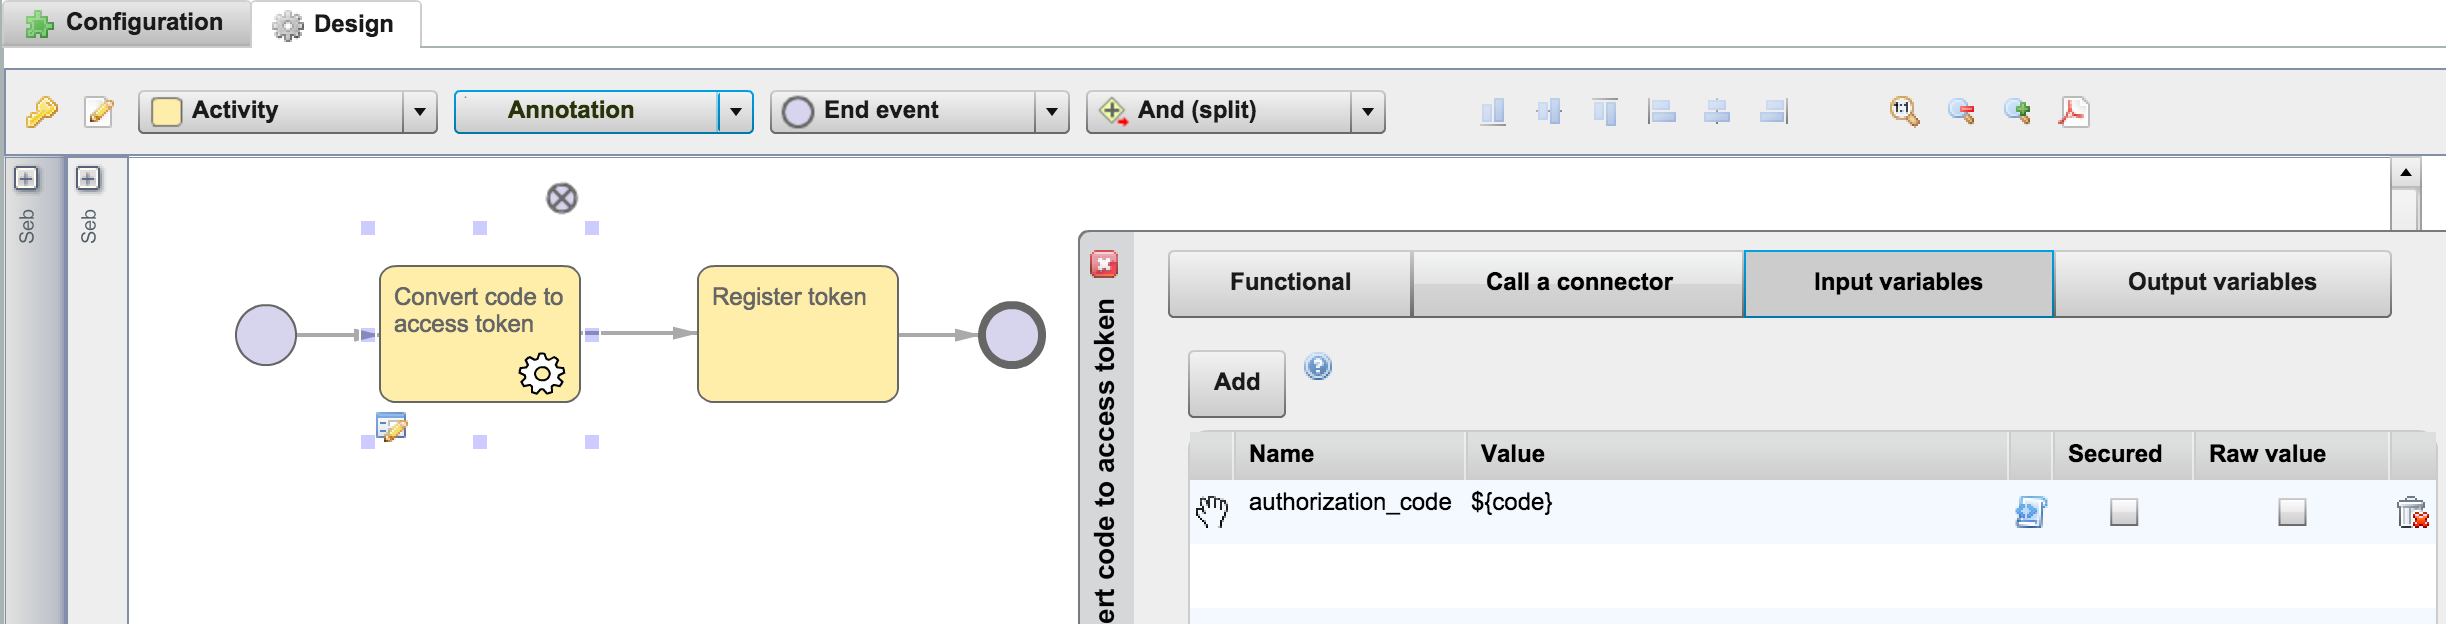
- It will receive the authorization_code as an input variable:
- As output variables, add the access_token with the value ${P_result.access_token}, and the refresh_token as an empty string:

- The second task will have the following output variables:
- token = ${P_json_put({}, 'access_token', access_token, true)}
- token = ${P_json_put({}, 'refresh_token', refresh_token, true)}
- token = ${P_save_oauth2_token('dropbox', token)}
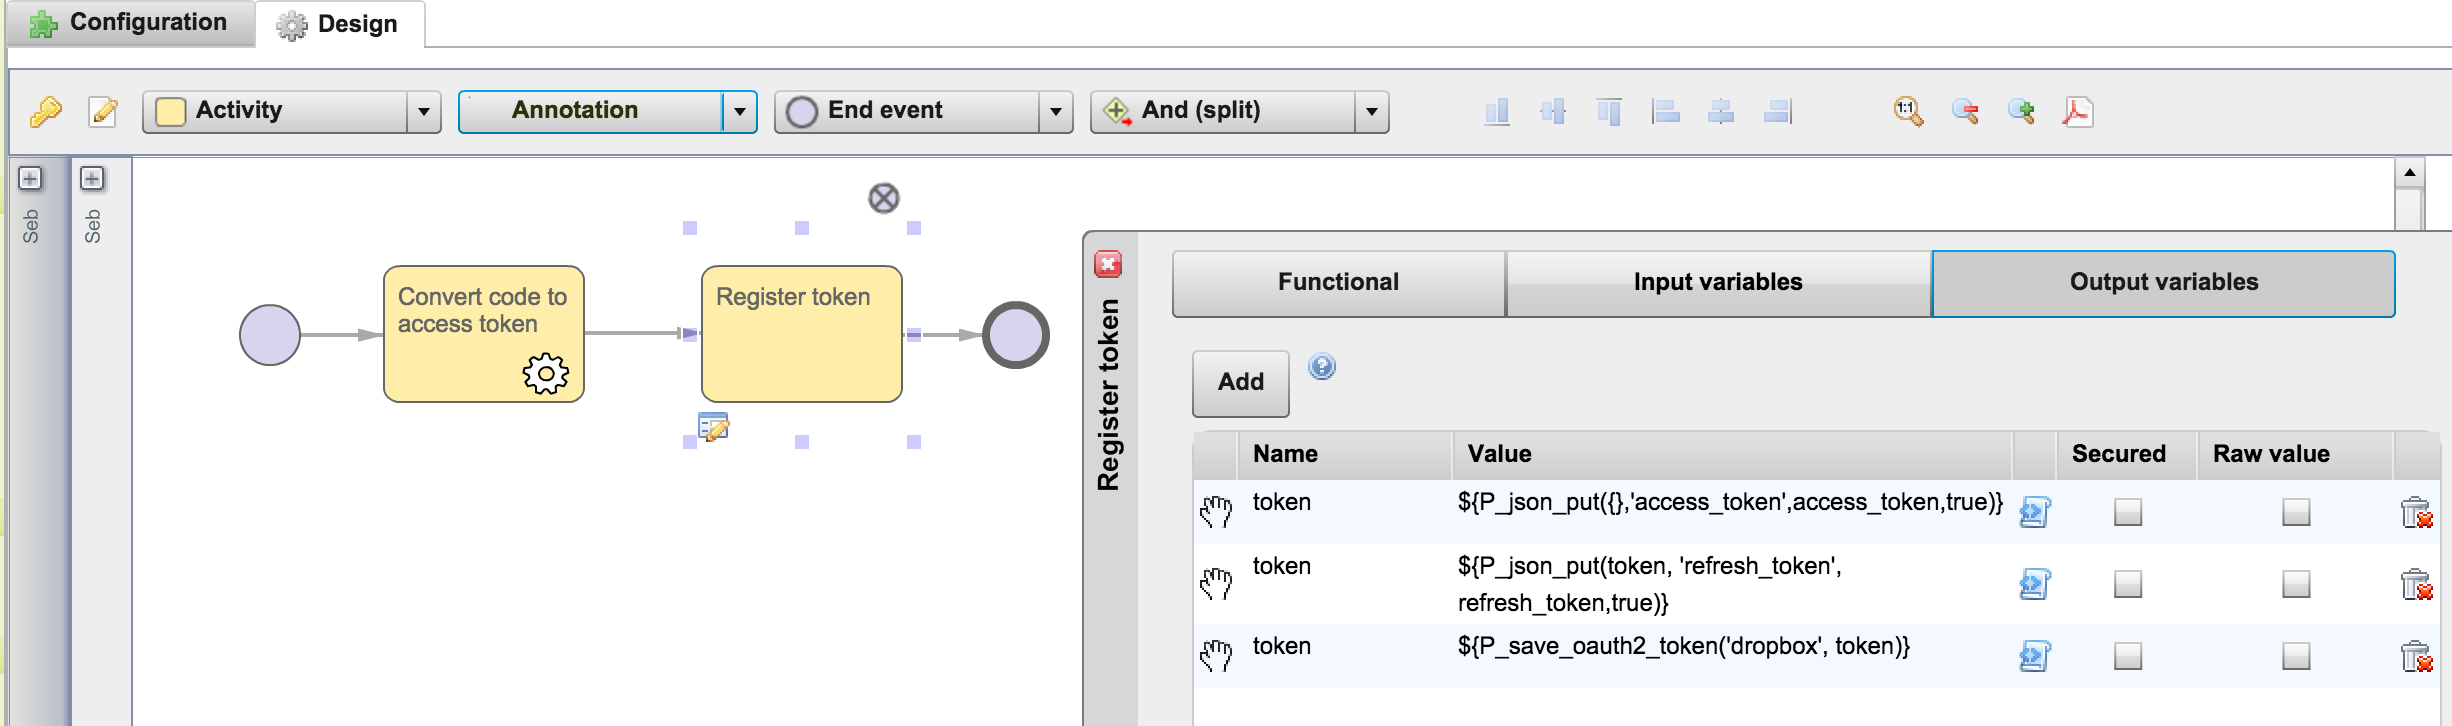
Here we have only two tasks, the first one will call the Dropbox OAuth API to convert the code to an access token, then this token is saved into the current user OAuth service token vault by calling the P_save_oauth2_token() method. Once done, the tokens associated to the current user are kept in a secure place, and will be easily retrieved by a connector configured to access the user's Dropbox. Of course here we have used dropbox as a service name, but you can use any name you want.
So now, we have all the needed resources to design our callback web interface, that will be called by Dropbox after the user has authorized our application to access their files.
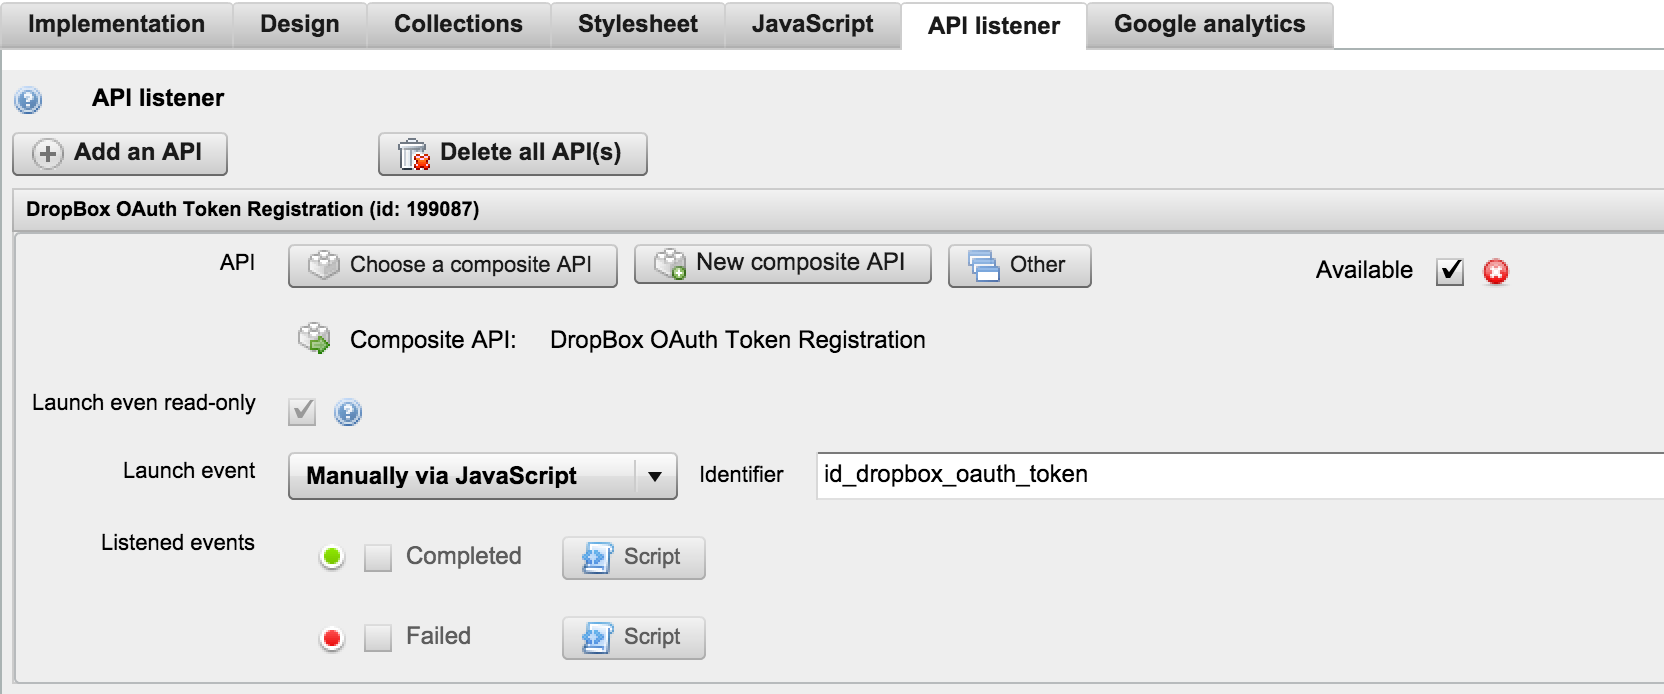
- From your project home page, create a new web interface, name it
Dropbox OAuth Token Authorize Callbackfor example, - Go to settings and the
Composite APIstab, and add an API listener by choosing ourDropbox OAuth Token RegistrationCAPI, - Make sur that the API listener id is
id_dropbox_oauth_token:
- And now, for the web interface design:
- Add a static text area, fill it with some greetings text to inform the user that they has sucessfully authorized the application to access their Dropbox files,
- Add a Javascript file.
Set its script to :
function registration_success(result) {
}
function registration_failure(error) {
    alert( JSON.stringify(error));
}

var registration_parameters = {};
registration_parameters.code = RMPApplication.getVariable('code');
id_dropbox_oauth_token.trigger( registration_parameters, {}, registration_success, registration_failure );
Basically here we are triggering the registration CAPI with some parameters. Dropbox will pass the code via the URL query string in a parameter named code and we are setting the refresh_token to an empty value (more on this later). A successful call will be silent, but a failure will display an alert box to inform the user. Of course this is a very simplistic way of handling the registration, feel free to add/change the web interface to adapt it to your case.
That's it for the web interface callback, now let's design the first web interface, the one we will use to redirect the user to the Dropbox authorize page.
Remember to replace the yourCallbackUrl placeholder of the Dropbox OAuth Token connector URL, with the URL of this new web interface.
Go to Dropbox authorize page web interface
This web interface only purpose is to redirect the user to the authorize Dropbox page. If the user is not already logged to their Dropbox account, a login page will be displayed before the authorize page, otherwise the authorize page is displayed right away, asking the user if they is with the fact that our Dropbox application will be able to access their Dropbox files.
The redirection URL must contain three parameters: a client id which is the Dropbox application key shown in the Dropbox developer application console, and a redirection URI, which must be one of the redirection URI listed in the same Dropbox developer application console, if the URI doesn't match a listed URI Dropbox will refuse to display the authorize page, to avoid to send an access token to an unknown URI. In our case this redirection URI is, of course, the URL of our Dropbox callback web interface.
Please note that, as usual, you can get an URL per execution mode of the web interface, so be careful when you configure your URIs in the developer application console. During the development period you should use the TEST mode URL, and when the Dropbox application is set to production, you can switch to the LIVE mode URL (you can also list the three URLs (LIVE, ACCEPTANCE, TEST) in the application console).
The third parameter, named state is sent to Dropbox, and will be sent back by Dropbox, as a parameter to the web interface callback, this can be used to retrieve some contextual information or check that the callback is really related to an authorization initiated by us.
So let's create this web interface !
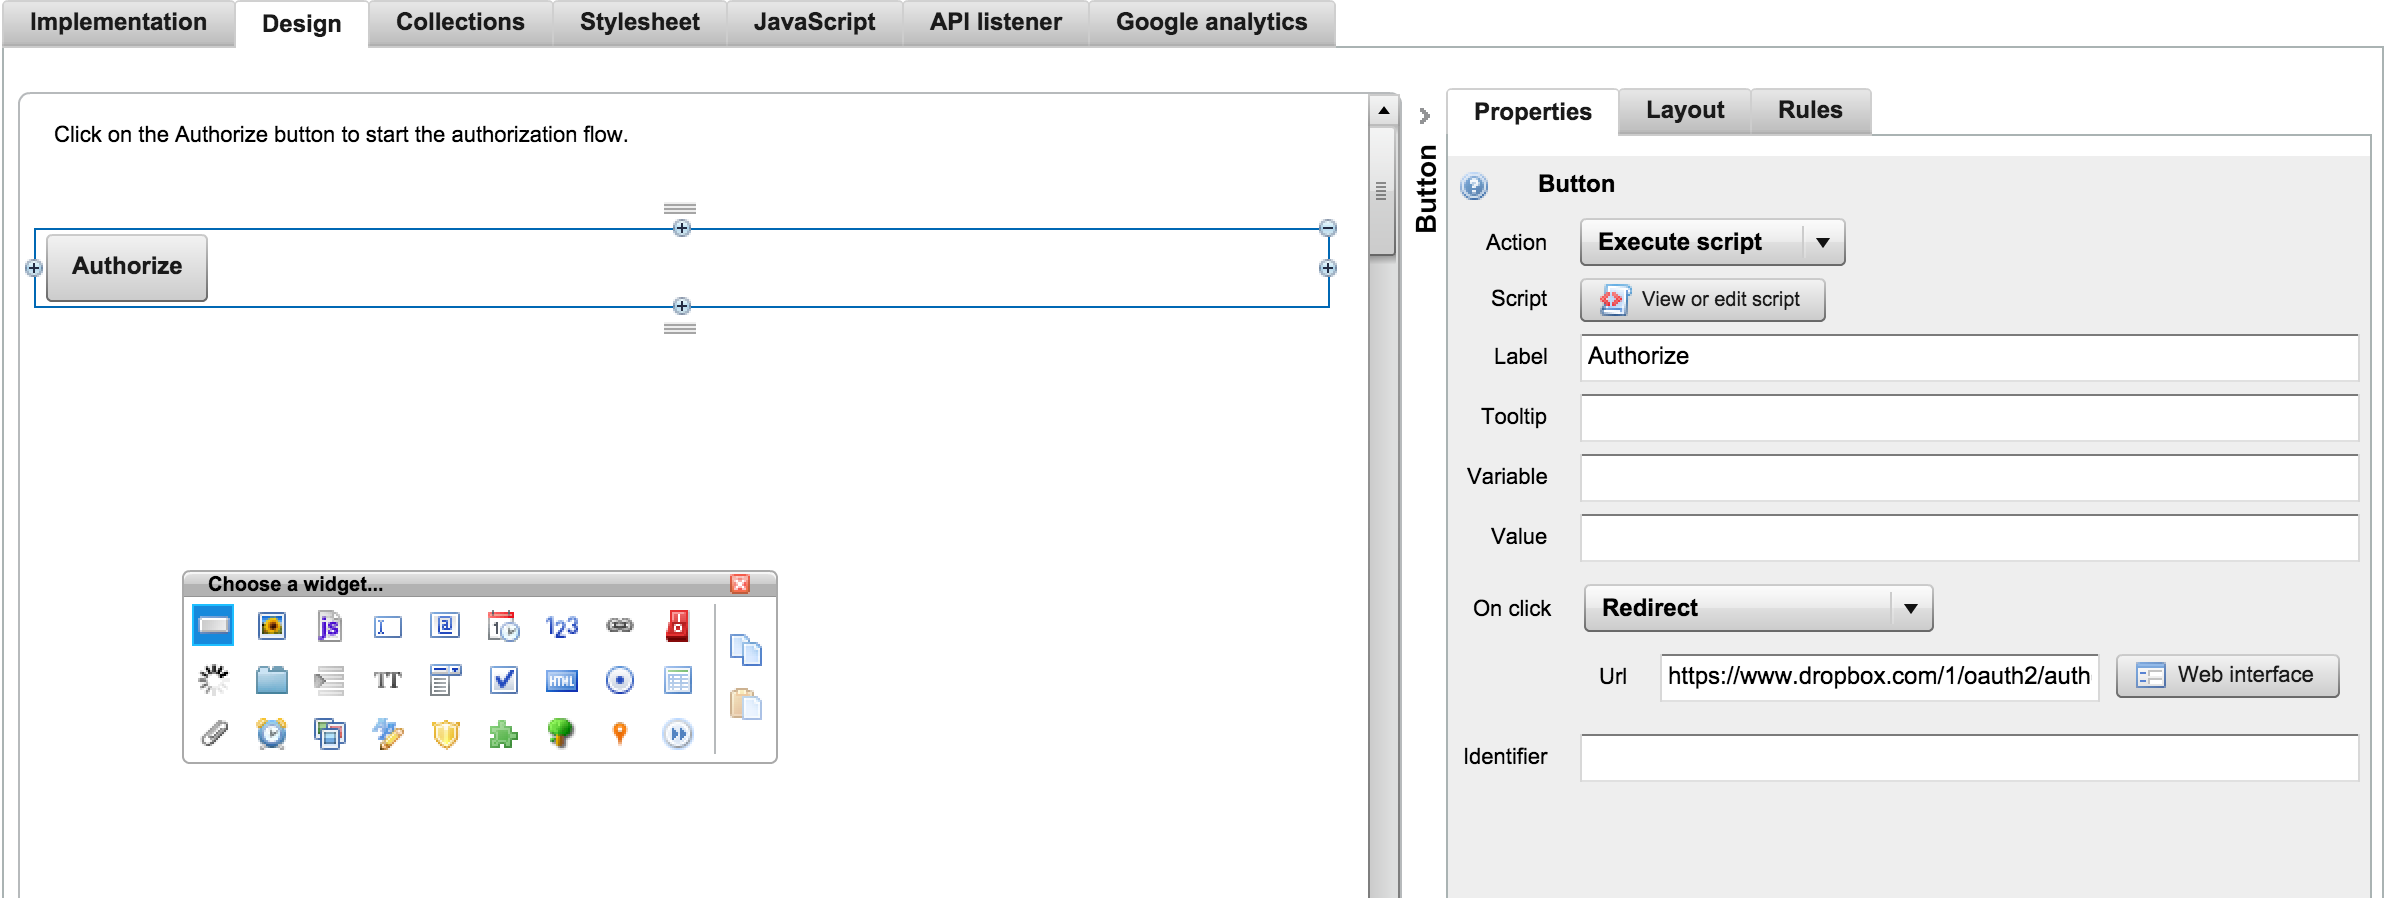
- From your project home page, create a new web interface, name it
Dropbox OAuth Token Redirectorfor example, - Add an static text area, fill it in with some text to explain the user that they will be redirected to their Dropbox account to authorize the application to access their files,
- Add an Execute script button, name it
Authorizefor example and set itson clickaction toRedirect.
Use this code in Javascript file:
const button = document.getElementById("id_button_authorize");
button.addEventListener("click", set_redirect_uri);

function set_redirect_uri() {
    const encoded_redirect_uri =
    encodeURIComponent("https://live.runmyprocess.com/live/yourCustomerId/appli/yourCallbackId?P_mode=TEST&P_version=");
    window.location.href =
    "https://www.dropbox.com/1/oauth2/authorize?response_type=code&client_id=yourAppKey&state=dropbox_authorization&redirect_uri="
    + encoded_redirect_uri;
}
Here we are encoding the callback URL to use it in a request query string, so do not forget to adapt the code and use your own web interface callback (created above) URL, specifically replace the yourCustomerId and yourCallbackId placeholders.
Do not forget to replace the yourAppKey placeholder, using your own app key found in the Dropbox developer application console.
- Your web interface should look like this :
So now we have everything to generate a Dropbox access token:
- Launch the Dropbox OAuth Token Redirector web interface
- Click on the Authorize button
- Sign in to your Dropbox account if needed
- Authorize the Dropbox application to access your files
- When the Dropbox OAuth Token Callback web interface is called, the access token is save into your OAuth 2.0 Service Token vault, you can check that in your settings view :
- Go to My Settings view, and click on the Connected Apps tab :

This view lists the known OAuth 2.0 services, that is the service names used with the P_save_oauth2_token() function.
Please note that deleting a token from this list, does not revoke the access token, to do that you have to go to your service account page, and revole the access from there. For example, to revoke a Dropbox access token, go to your Dropbox account security page.
Let's use this access token now!
Dropbox connector with OAuth 2.0 authentication
Now that we have an OAuth 2.0 access token, securely stored into our OAuth service tokens vault, let's use it in a web connector.
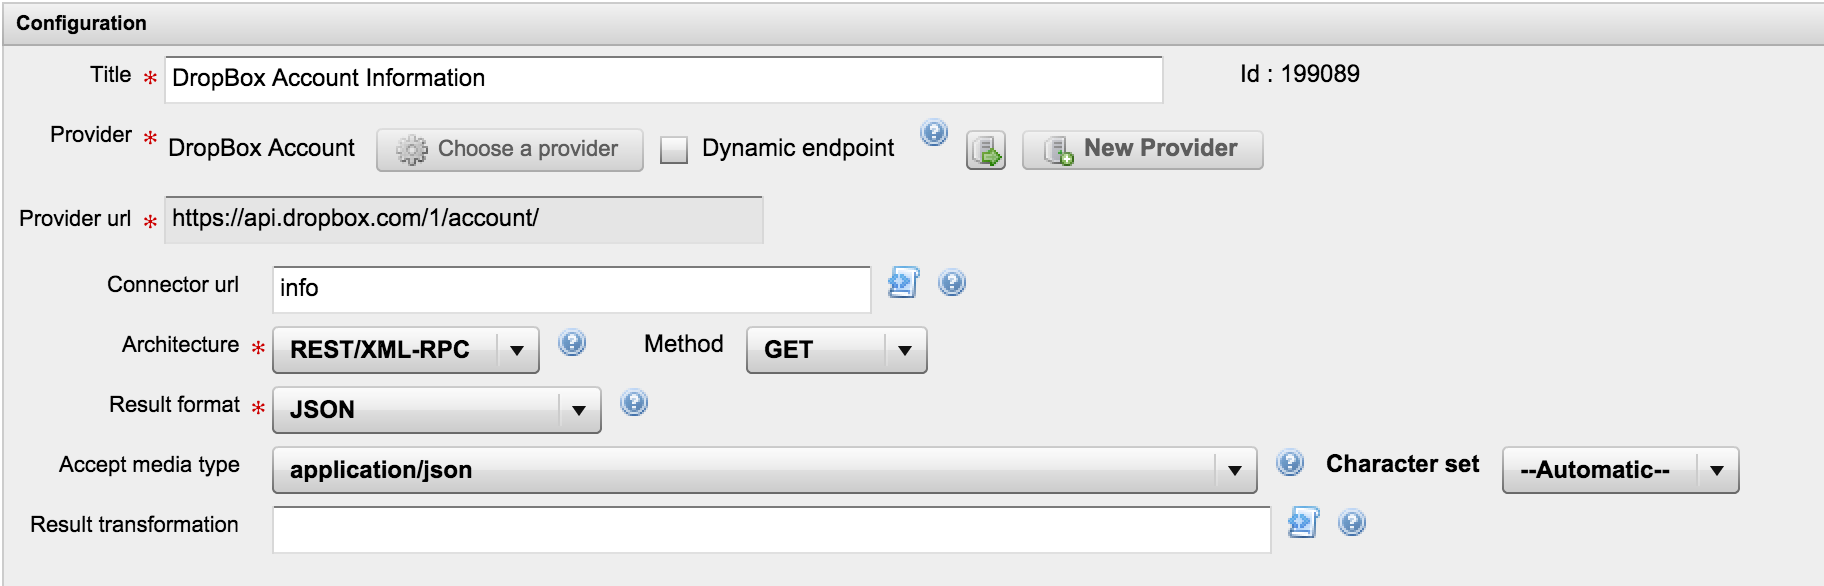
- From your project home page, create a new web service, name it
Dropbox Accountfor example, - Set the URL for each mode to : https://
api.dropbox.com/1/account/ - Set the
Authentication schemefor each mode to :OAuth v2 - Set the
Accesstoken field for each mode to :${P_get_oauth2_token('dropbox').access_token}

- Save the provider, and click on the
New Connectorbutton - Set the name of the connector to
Dropbox Account Informationfor example - Set the connector URL to :
info - Set the
Method,Result formatandAccept media typeas shown in the screenshot below:
Click on the Launch button, and if everything goes well you should receive some JSON with your own Dropbox account information.
We are calling a Dropbox API using an OAuth 2.0 access token, retrieved from our OAuth service tokens vault, using the P_get_oauth2_token() method.
See also
The official OAuth 2.0 specifications
The official OAuth 2.0 web site
The Dropbox blog explaining how to use OAuth 2.0 with Dropbox API
The Dropbox developer site
The Dropbox developer App console
The Dropbox core api documentation
The RunMyProcess Freemarker API documentation, where you can find the documentation of the project vault API and OAuth service tokens API in the Request section.
Please give details of the problem