How to generate a PDF file
Overview
PDFs can be generated from an XSL-FO stylesheet. XSL-FO is part of XSL (Extensible Stylesheet Language), a set of W3C technologies designed for the transformation and formatting of XML data. Apache FOP (see https://xmlgraphics.apache.org/fop/) is the underlying framework to produce PDFs in RunMyProcess.
The following XML/XSL example may provide a conceptual guidance about the PDF generation.
Let's assume that you have some JSON data about your employees that you'd like to display:
{
    "org": {
        "company": "RunMyProcess",
        "employee": [
            {
                "id": "1",
                "name": "Claudia",
                "designation": "CEO"
            },
            {
                "id": "2",
                "name": "Vic",
                "designation": "Sales"
            },
            {
                "id": "3",
                "name": "Uno",
                "designation": "CTO"
            }
        ]
    }
}
A simplistic XSL-FO stylesheet for putting this data into a PDF table could look like this:
<?xml version="1.0" encoding="utf-8"?>
<xsl:stylesheet version="1.1" xmlns:xsl="http://www.w3.org/1999/XSL/Transform"
    xmlns:fo="http://www.w3.org/1999/XSL/Format" exclude-result-prefixes="fo">
    <xsl:template match="org">
        <fo:root xmlns:fo="http://www.w3.org/1999/XSL/Format">
            <fo:layout-master-set>
                <fo:simple-page-master master-name="simpleA4" page-height="29.7cm" page-width="21cm" margin-top="2cm" margin-bottom="2cm" margin-left="2cm" margin-right="2cm">
                    <fo:region-body/>
                </fo:simple-page-master>
            </fo:layout-master-set>
            <fo:page-sequence master-reference="simpleA4">
                <fo:flow flow-name="xsl-region-body">
                    <fo:block font-size="16pt" font-weight="bold" space-after="5mm">
                        Company Name: <xsl:value-of select="company"/>
                    </fo:block>
                    <fo:block font-size="10pt">
                        <fo:table table-layout="fixed" width="100%" border-collapse="separate">
                            <fo:table-column column-width="4cm"/>
                            <fo:table-column column-width="4cm"/>
                            <fo:table-column column-width="5cm"/>
                            <fo:table-body>
                                <xsl:apply-templates select="employee"/>
                            </fo:table-body>
                        </fo:table>
                    </fo:block>
                </fo:flow>
            </fo:page-sequence>
        </fo:root>
    </xsl:template>
    <xsl:template match="employee">
        <fo:table-row>
            <xsl:if test="designation = 'CEO'">
                <xsl:attribute name="font-weight">bold</xsl:attribute>
            </xsl:if>
            <fo:table-cell>
                <fo:block>
                    <xsl:value-of select="id"/>
                </fo:block>
            </fo:table-cell>

            <fo:table-cell>
                <fo:block>
                    <xsl:value-of select="name"/>
                </fo:block>
            </fo:table-cell>
            <fo:table-cell>
                <fo:block>
                    <xsl:value-of select="designation"/>
                </fo:block>
            </fo:table-cell>
        </fo:table-row>
    </xsl:template>
</xsl:stylesheet>
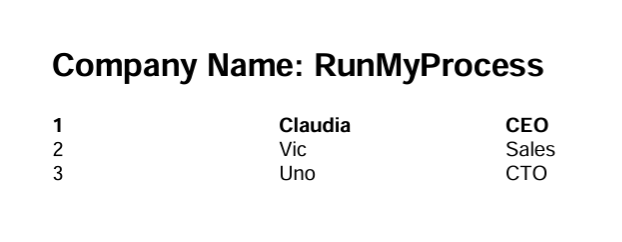
When generating the PDF based on the JSON input data and the XSL-FO stylesheet, the resulting PDF will look like this here:
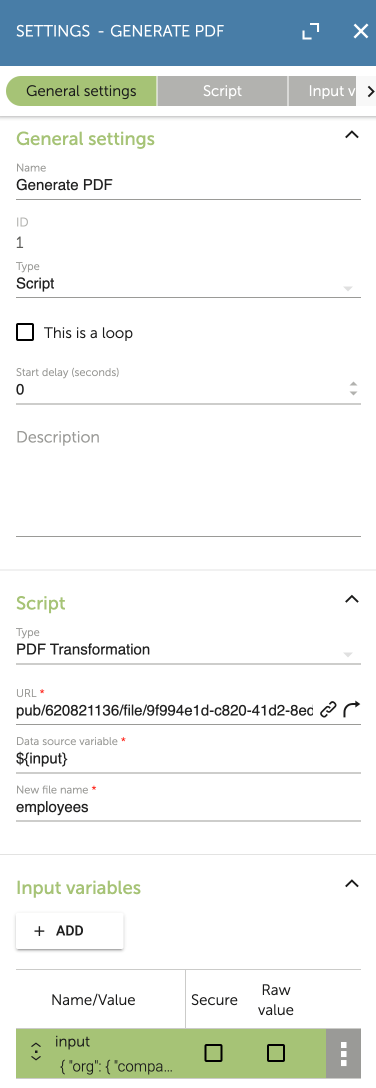
In DigitalSuite, you can configure the PDF transformation in a workflow activity as shown below:
- General Settings - Type: Script
- Script - Type: PDF Transformation
- URL - select the XSL-FO file stored from your "Versioned Files" storage
- Datasource Variable: ${someVariableName} (here: ${input} )
- New file name: the PDF filename without extension (.pdf will be added by the system)
- Input Variables: define the variable with the input data for the PDF (here: input={someJson} )
Once the process is executed the PDF will be stored in your projects file storage (unversioned).
XSL-FO Generation via Tools
Creating a XSL-FO stylesheet can be a cumbersome task. There are tools available that can help you to visually design your stylesheet, such as:
- FOP Designer by Java4Less: http://www.java4less.com/fopdesigner/fodesigner.php
- XSL:FO Editor by Stylus Studio: https://www.stylusstudio.com/xsl-fo-processing.html
- FO Editor by OxygenXML: https://www.oxygenxml.com/xml_editor/fo_editor.html
AI can also be used to generate a template.
- Upload the .docx file via the AI tool prompt and ask Transform the attached docx file to XSL-FO
Another approach is to design your Base-Template in Microsoft Word, transform the doc file into XSL-FO and refine the transformation from there. The following steps may help you with this:
-
Download the Microsoft WordprocessingML to XSL FO (XSLFO) Converter.
-
Extract the downloaded file.
-
Create a template with Word 2003 or 2010.
-
Go to the "Save as" menu and select "Word 2003 XML document" in the "Save as type" option (if you are not using Word 2003).
-
Select the option "Apply transform" and select the "Word2FO.xsl" style sheet you have just extracted.
Creation of the variable used to generate the document
In your process, create a variable that contains all the variables you want to use in your template with the following structure. We use the variables var_1 and var_2 to create our PDF document:
{"my_var_main":{"var_1":"value_1","var_2":"value_2","my_array"}}
If you want to use an array of values to create your PDF document, use the following syntax:
{"my_var_main":{"var_1":"value_1","var_2":"value_2","my_array":[{"name":"John","age":"35"},{"name":"Jessica","age":"28"}]}}
Configuration of the template
-
Open the template with a text editor and save it with a
.xslextension. -
Add the following lines before the
<fo:root>element.
Code
<xsl:stylesheet version="1.1" xmlns:xsl="http://www.w3.org/1999/XSL/Transform" xmlns:fo="http://www.w3.org/1999/XSL/Format" exclude-result-prefixes="fo">
    <xsl:output method="xml" version="1.0" omit-xml-declaration="no" indent="yes"/>
    <xsl:template match="my_var_main">
where my_var_main is the name of the main element of your JSON that contains all the variables you want to write in your documents.
- Add the following lines add the end of the document, after the
</fo:root>element
Code
    </xsl:template>
</xsl:stylesheet>
- To add a variable in your template, add the following tag
Code
<xsl:value-of select="var_1"/>
where var_1 is the name of one of your variable
- To add an array of variables, add the following tag to the main template
Code
<xsl:apply-templates select="my_array"/>
and create the template for each line of the array. To do so, add another tag with the content of a line of your array after the </xsl:template> tag of the main template. Here is an example of the template of a line
Code
<xsl:template match="my_array">
    <fo:table-row>
        <fo:table-cell>
            <fo:block>
                <xsl:value-of select="name"/>
            </fo:block>
        </fo:table-cell>
        <fo:table-cell>
            <fo:block>
                <xsl:value-of select="age"/>
            </fo:block>
        </fo:table-cell>
    </fo:table-row>
</xsl:template>
- you can also use the if function
Code
<xsl:if test=' age > 30 '>
...some output if the expression is true...
</xsl:if>
-
for more details about the xsl functions, here is a tutorial.
-
if your array has more than one page and you want the header of the array to be displayed on top of each page, you just have to put the header of the array in a header tag. See the example below:
Code
<fo:table>
    <fo:table-column column-number="1" column-width="230.3pt" />
    <fo:table-column column-number="2" column-width="230.3pt" />
    <fo:table-header>
        <fo:table-row>
            <fo:table-cell>
                <fo:block>
                    <fo:inline>
                        <fo:leader leader-length="0pt" />Column 1 title
                    </fo:inline>
                </fo:block>
            </fo:table-cell>
            <fo:table-cell>
                <fo:block>
                    <fo:inline>
                        <fo:leader leader-length="0pt" />Column 2 title
                    </fo:inline>
                </fo:block>
            </fo:table-cell>
        </fo:table-row>
    </fo:table-header>
    <fo:table-body>
        <xsl:apply-templates select="my_array"/>
    </fo:table-body>
</fo:table>
Configuration of the process to use your template
-
After the configuration of the template is done, Create activty and select Settings
-
In your process, select the activity type script
-
In the script tab, select PDF Transformation
-
Click on Uploaded XSL files and select your file
-
In Data source, enter the name of the variable that contains all the variables you want to use to generate the PDF
-
In the ouput parameters of the task, add a variable with the value ${P_result.id} to store the id of the file
The configuration is done!
Example
Here is an example of an XSL-FO template.
Below you can find the structure of the variable used to generate the PDF file:
{"my_var_main":{"client_name":"My company","users_array":[{"name":"John","age":"35"},{"name":"Jessica","age":"28"},{"name":"James","age":"52"}]}}
This template was use to generate this PDF file.
Known issues
The transformation of the .doc document to an xsl document has some issues.
-
The cells of the arrays may appear to be filled in black. If so, change the propertie
background-color="black"of the<fo:table-cell>tags tobackground-color="white" -
The header of the document may be overridden by the body of the document. To fix that, increase the height of the top margin of the documents. This property can be found as follows:
Code
<fo:layout-master-set><fo:simple-page-master><master-name="section1-odd-page"> (and <master-name="section1-odd-page">)<fo:region-body margin-top="10pt">
- The attribute
font-family="Arial"for example does not work. Whichever the font-family specified into the template, it will display Times New Roman. However, if no font-family is specified anywhere into the template, it will display Arial.