Overview
In this section, you will learn about the components of an application and how to proceed when developing an application.
Designing an Application
A RunMyProcess DigitalSuite application with its components is managed in one or more projects which are defined in DigitalSuite Studio. Before you start to create a development project, you should have a clear understanding of the application setup and design. You should define a high-level specification of the application taking into account the following aspects:
- Groups/Users: Who is involved in using or managing the application? Which steps are performed by the different users? Which access rights do they need?
- Workflow/Process: What does the business logic and workflow look like? Which steps are involved?
- Actions: Which actions are required in the process, for example, manual interaction like approval steps or email notification?
- Information/Data: Which data is required and which system is it retrieved from or stored in?
- Web interface design: What should the web interface look like? Which screens are presented to the different users involved in the process?
- Reports & KPIs: Which reports are needed? Which KPIs are to be collected in these reports?
- Integrations: Which external systems need to be connected?
The main steps in designing an application are the following:
- Defining the user roles for the application.
- Setting up a project for your application.
- Designing the web interface.
- Designing the process.
- Testing, deploying, and running the application.
- Creating reports.
For advanced features like integrations and data storage, refer to Advanced Features.
Sample Application
To guide you through the development of an application, we are referring to a sample. It reflects a simple expense request workflow, starting with the request issued by an employee, followed by the approval by a manager and the payment confirmation by the administration, and ending with storing the expense data in a company-wide database (collection).
The application is managed in one project. The basic components it consists of are a main process and a web interface with different screens which reflect the tasks of the roles involved.
Every main step in the Getting Started descriptions of this Developer Guide contains information on how the step is implemented in the sample application.
Users and Roles
The following roles are involved in the workflow: Employee, Manager, and Administration. For details about defining the user roles for the sample application, refer to Users and Roles.
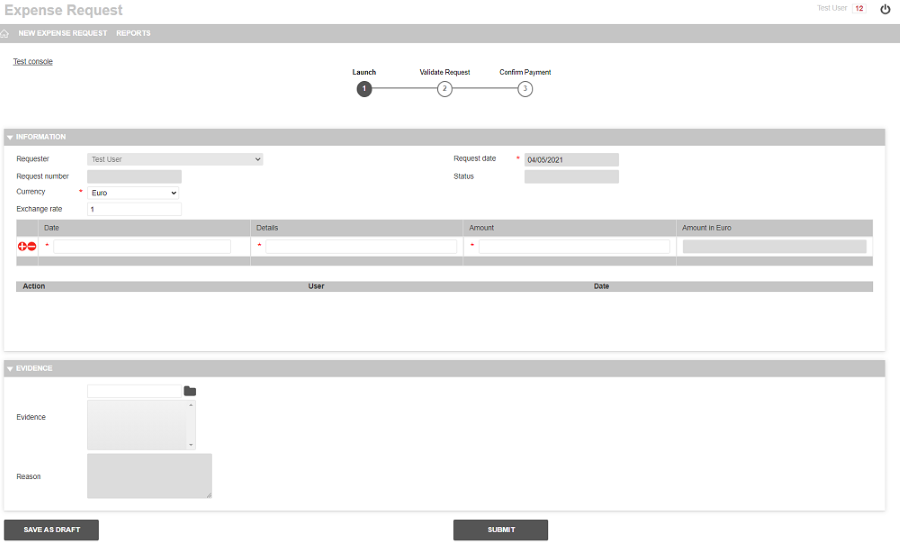
Web Interface
The following image shows the launch screen of the sample web interface as exposed to users. The progress bar reflects the workflow. The form contains all fields required for an expense request. Web interfaces are designed using the WebModeler of DigitalSuite Studio. For details, refer to Web Interface Design.
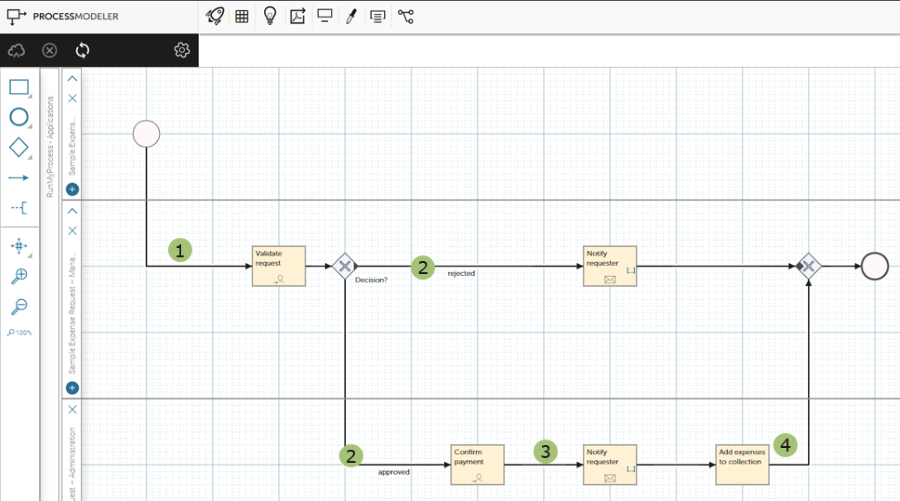
Workflow/Process
The workflow of the expense request application includes the following steps:
- The expense request is filled in and submitted by an employee. A task to validate the new request is assigned to the managers.
- The request is validated and either rejected or approved by a manager. In both cases, a notification email is sent to the requester informing about the rejection or approval.
- If the request is approved, a new task is assigned to the administration team for confirmation of the payment. The requester is informed by email.
- The expense data is stored in a database (collection).
The following image shows the process as modeled using the ProcessModeler of DigitalSuite Studio. For details, refer to Process Design.