Process Design
In this section, you will learn how to design the process reflecting the business logic of your application.
Designing a Process
To create the process for an application, proceed as follows:
- Open the project for which you want to create the process.
- Select Processes and click Add.
- Define a name for the process, and proceed to the next step.
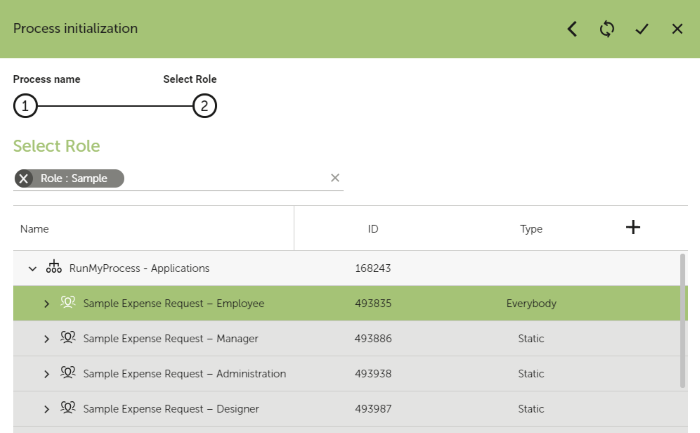
- Select a role you have defined before as the trigger role for the process. For details about defining roles, refer to Users and Roles.
When you confirm your entries, the process is saved, and its design is opened in the ProcessModeler on a new browser tab. Each role involved in the process execution is assigned its own lane, where you place all activities the role is responsible for. You can at any time add lanes for roles as required.
Proceed with defining and configuring the process steps and components required for the workflow. The start event of the process is created automatically together with the process. You can configure it as required and/or drag it to a different lane as needed.
For details about the ProcessModeler, refer to:
Using Steps
The main components of a process are steps and elements of the following types:
- Start/end events
- Manual tasks
- Email/push notifications
- Connectors
- Script execution
- Subprocesses
- Gateways (XOR / AND)
- Timers
- Error handlers
- Variable mapping and calculation
The following image illustrates how the step types are used:
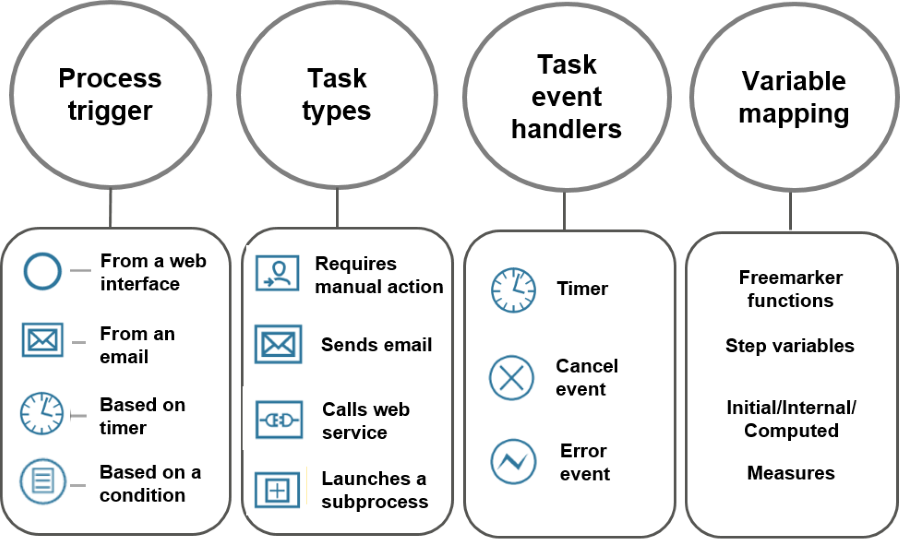
For details, refer to Process Step Types.
Sample Application
The process for the sample application contains the following elements:
- A start and an end event
- Manual activities for validation steps
- An activity for storing data in a collection
- Email activities for notifications sent in case of approval or rejection
- Gateways for decisions
To create the process for the sample application, proceed as follows:
- Open the Sample Expense Request project.
- Create a process and define Sample - Expense Request as its name.
- Select the Sample Expense Request – Employee role from the Sample Applications organization as the trigger role for the process. The ProcessModeler opens and the start event is automatically inserted.
- Save the process.
- Create and configure the elements of the process as described below.
Adding Lanes for Roles
As the sample application involves different roles, you need to add lanes for the Sample Expense Request – Manager and Sample Expense Request – Administration roles of the Sample Applications organization.
Defining the Process Steps
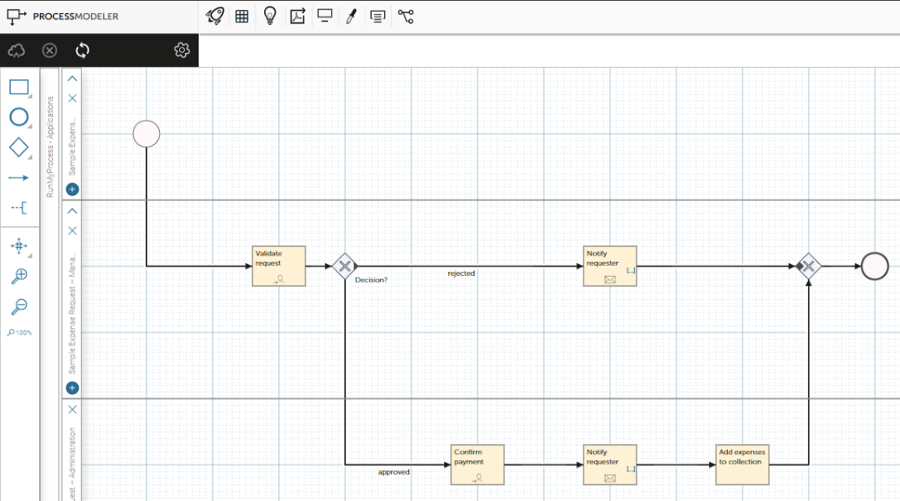
For the workflow of the application, you need to create the following process steps and gateways as shown in the image below:
- Validate request and Confirm payment manual activities for the validation steps performed by the Sample Expense Request – Manager or Sample Expense Request – Administration role.
- Add expenses to collection activity for storing the expense data to a collection.
- Notify requester about rejection and Notify requester about payment email activities for the email notifications sent in case of request approval/rejection or payment confirmation.
- A gateway for the decision point in the process and a gateway to join the execution paths.
Configuring the Manual Activities
For the manual activities, proceed as follows:
- Create the Validate request manual activity by selecting Manual Activity from the vertical toolbar and placing it in the appropriate lane.
- Assign the appropriate web interface and screen to the activity.
- Leave the Assign to field empty. In this case, the activity is assigned to the entire lane/role.
Do the same for the Confirm payment manual activity for the Administration role.
Configuring the Email Activities
For the notification steps, proceed as follows:
- Create the Notify requester about rejection email activity by selecting Email Activity from the vertical toolbar and placing it in the appropriate lane.
- Select Notify via email, and choose an email provider.
- For To (emails), define the recipient (email address for notifications), for example, as
${P_initiator.login}. - Define some dynamic content for the email, for example:
${i18n("rejection_email","Bad news,
Your expense request REQUEST_NUMBER has been rejected.")?replace("REQUEST_NUMBER",request_number)}
The request_number variable is defined as an output variable in the Start event, for example, by the following Freemarker script:
EXP-Test-${now("yyyyMM")}-${next_value("Test"+now("yyyyMM"))}
For details about the next_value() method, refer to the API documentation.
The resulting email text looks like this:
Bad news,
Your expense request EXP-Test-202103-0 has been rejected.
Do the same for the Notify requester about payment email activity with an adapted email text, for example:
${i18n("approved_email","Good news,
Your expense request REQUEST_NUMBER has been approved.")?replace("REQUEST_NUMBER",request_number)}.
Configuring the Activity for Data Storage
In order to store data entered by the requestor of an expense, the sample application uses a collection. A process activity is responsible for transferring the data to the collection.
- Before you configure the activity, create a collection in your project, and name it sample_expenses. For details, refer to Creating a Collection.
- Create the Add expenses to collection activity by selecting Activity from the vertical toolbar and placing it in the appropriate lane.
- Define an expenses input variable for the Add expenses to collection activity to store the data in the collection. The variable value could, for example, look like this:
<#assign expenses = transpose(array_expenses)>
${save_object(expenses,"sample_expenses")}
The array_expenses variable is defined in an array widget of the web interface. It collects the data which are defined in the columns of the array widget. For details, refer to Web Interface Design.
sample_expenses is the name of the collection to store the data. For details about collections, refer to Collections.
Configuring the Gateways
For the gateways, proceed as follows:
- Create a Split Gateway which is linked to the
decisionvariable assigned to the Approve and Reject buttons on the web interface. - Create a Join Gateway to join the execution paths, and join the gateway to the end event.
Completed process
The following image shows the complete process of the expense request sample: