Build a Quick Application
This tutorial is designed for users who are new to the RunMyProcess platform, it will guide you step-by-step through the stages of a simple application development. The application we will produce includes the main steps that are common to most applications on the platform - creating a project, creating a custom list, creating a web interface, designing a process, adding a web connector and integrating with a spreadsheet.
Building this application will give you a basic understanding of how the RunMyProcess platform works. Once you are comfortable with this project, we suggest that you move on to other help tools provided.
What the application does
In the final version of the application, a user will be able to select a currency YYY from a list, in a web interface, and submit it.
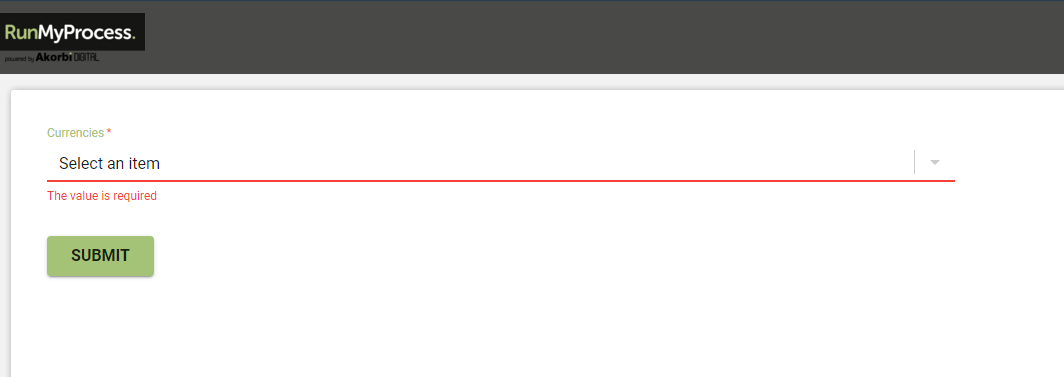
Clicking on the Submit button will trigger a workflow process that will:
-
Get FX rates from the European Central Bank connector for the currency chosen by the user.
-
Assign a task to another user that will display the current FX rate and asks for his/her approval.
-
Upon approval, the application will write the FX rate, the name of the user and the date to a Google spreadsheet.
Let's get started
1. Getting Started: Creating Your Development Environment
This guide walks you through setting up your development environment in RunMyProcess.
-
Create a New Organization: Click Roles > New Organization. Enter a name and description for your organization.
-
Assign the Designer Role: Click New Role. Enter a name and description for the designer role (required for creating applications). The designer role is essential for building applications in RunMyProcess.
-
Add Users to Your Role: Click the Members section, go to the TEST option, and then click Add Users. Search for the user by name or email address and drag them to the User List.
Find more information about User Roles in the user guide
Find more information about Environments in the user guide
2. Create a New Project to Begin Building Your Application
-
Click Projects in the Home section to access the project creation menu.
-
Enter a Title for your project.
-
Select the designer role you created earlier. This role is required for project development.
-
Click Confirm.
3. Adding Email Functionality with a Subproject
RunMyProcess allows you to include pre-built functionalities from other projects into your project using subprojects.
To enable email functionality in your application, follow these steps:
-
Click Subprojects > Add to add a subproject to your current project.
-
Search for and select Mail Provider.
-
Click Confirm to add the Mail Provider subproject.
The Mail Provider project is deployed on all accounts and is the RunMyProcess default email provider.
4. Start Designing Your Workflow by Creating a Process
-
Click on the Processes tab and select Add to create a new process.
-
Enter a descriptive name for your process. Ideally, it should match your application name for clarity.
-
Select the role that will be authorized to initiate this process.
The role you select must also be a member of the project to trigger the process.
-
Different process models may require different roles to trigger them. Refer to your specific process model for guidance on role selection.
5. Work with the Process Modeler
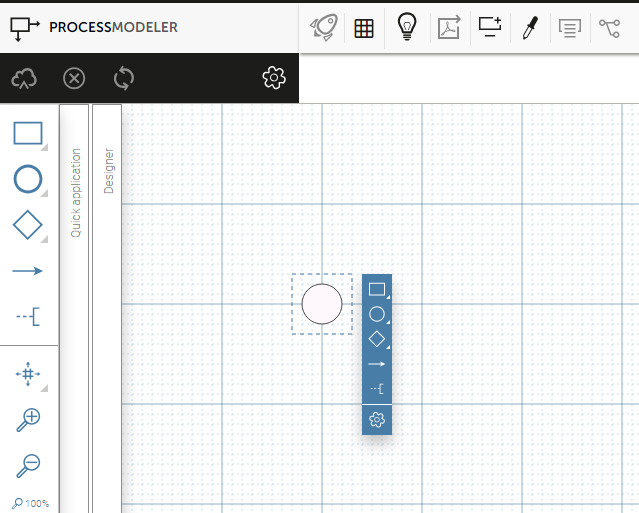
Once the new process is created, you will see the Process Modeler, the visual design workspace for your process.
-
Identify Start and End Points:
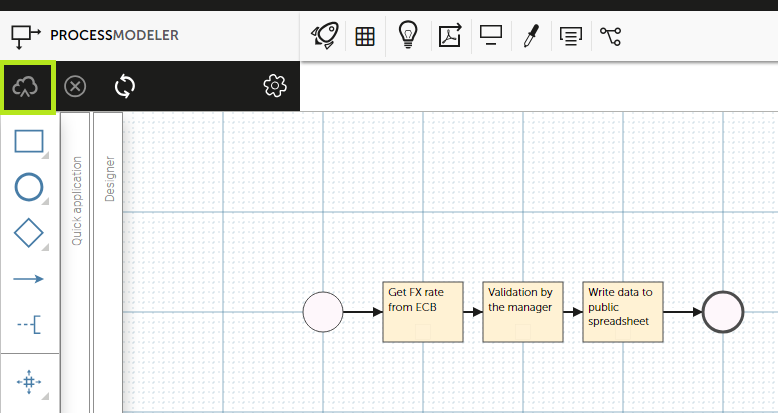
The grey circle represents the process start point. The end point, marked by another grey circle, signifies the completion of the process.
-
Build Your Process Flow:
The Tools Panel surrounding the workspace contains various elements you can use to build your process flow.
-
Click and drag the Step icon (may appear as a blue square) from the Tools Panel to the right of the start circle to add a new step.
-
Repeat this action three times to create a total of four steps (including the starting point).
-
Double-click each step and rename them with the following text:
Step Name 
Get FX rate from ECB 
Validation by the manager 
Write data to public spreadsheet
-
-
Save and Navigation:
- Click the Save button to save your process design.
- You can return to the project list by clicking the Project’s Name tab.
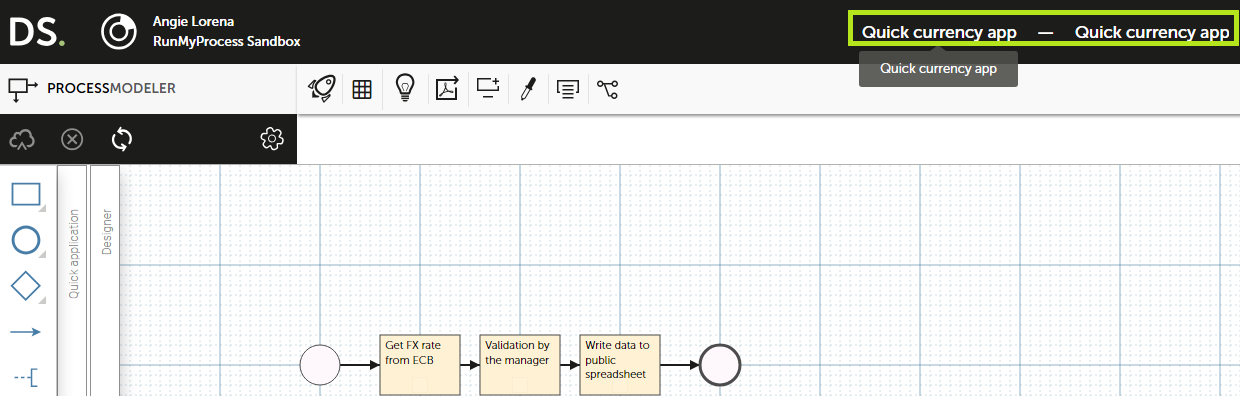
Tip: You can find all the project resources and navigate them here:

For a complete list of process design features, refer to the Process Design section of the RunMyProcess user guide.
6. Create a Custom List for Drop-Down Menus
To populate a drop-down menu with currency options in your web interface. Follow these steps to create a custom list:
-
In the RunMyProcess platform, navigate to the Custom Lists section (refer to the user guide. for specific instructions if needed).
-
Click Add to create a new custom list. Enter a descriptive name, such as "Currencies," to identify its purpose.
-
Click Add List Item for each currency you want to include in the drop-down menu. Fill out the following details for each list item:
Label Value EUR EUR USD USD GBP GBP -
Click Save to confirm the creation of your custom list.
7. Build Your Application's User Interface
Now that you've defined the process flow and data structures, it's time to create the web interface where users will interact with your application.
-
In the RunMyProcess platform, navigate to the Web Interfaces section.
-
Click Add to create a new web interface. Enter a descriptive name that reflects the application's functionality.
-
Click Save
8. Integrate the Currency List into Your Web Interface
-
Open the web interface you created in the previous step. The RunMyProcess web interface editor allows you to visually design the layout and functionality of your interface.
-
In the editor, locate the Widgets panel. Find the Custom List widget and drag the Currencies list onto the web interface design canvas.
-
Set the Value variable name to currency_value.
-
Click Save to confirm the changes made to your web interface
9. Enable Process Triggering with a Submit Button
-
Locate the Widgets panel within the editor.
-
Find the Submit Button widget and drag it onto your web interface design canvas.
-
From the button's properties menu, find the option to link it to a process.
-
Select the process you created earlier from the available options.
-
Click Save to confirm the changes made to your web interface.
10. Design a Screen for Process Validation
In the RunMyProcess web interface editor, locate the section Screens.
-
Click the Add button to create a new screen.
-
Enter a descriptive name for your new screen, such as 'Validation,' to reflect its purpose in the process flow.
-
Click Save to confirm the creation of your new screen.
11. Control What Appears on Each Screen
RunMyProcess web interfaces can have multiple screens to guide users through different steps in your process. You can control which widgets appear on each screen to provide a focused and informative user experience.
To manage what appears on each screen:
-
While editing your web interface, click on a specific widget to open its properties or settings menu.
-
Within the widget settings, you'll find a section for controlling the widget's visibility. This typically includes options like Available, Visible, and Editable.
Let's look at an example:
In our example, we want the Currency widget to be visible on the Validation screen. So, we would:
-
Select the Validation screen.
-
Click on the Currency widget.
-
In the widget settings, ensure Visible and Available are checked, while Required and Editable (if applicable) are unchecked.
-
Click Save to confirm the changes.
The Submit button is typically hidden by default on validation screens as it's meant for initiating the process, not within the validation step. You can leave it hidden on the Validation screen.
12. Add a Field for User Input
We'll now add a field where users can enter the FX rate for validation.
-
In the Widgets panel, locate the Input Number widget.
-
Drag and drop the Input Number widget onto the Validation screen. (Alternatively, place it next to the 'Currency' widget for better organization.)
-
Select the newly added Input Number widget to open its properties menu.
-
Change the label of the widget to FX Rate to clearly indicate its purpose.
-
Click Save to confirm the changes made to the Validation screen.
13. Include Buttons for User Actions
Now, let's add buttons for the user to validate or reject the FX rate.
-
In the Widgets panel, locate the Submit Button widget again.
-
Drag and drop the Submit Button widget onto the bottom left corner of the Validation screen.
-
Change the button label to Validate to clearly indicate its purpose. Configure the button to:
-
Set a variable named choice to the value validated upon clicking.
-
Set the button's ID to id_button_validate for easier identification within your process logic.
-
-
Repeat steps 1 and 2 to add another button on the bottom right corner of the screen.
-
Customize the second button's label to Reject.
-
Configure the reject button to:
- Set a variable named choice to the value rejected when clicked.
- Set the button's ID to id_button_reject for easier identification within your process logic.
-
Click Save to confirm the changes made to the Validation screen.
14. Designate Step 2 as a Manual Task
We'll now configure the second step in our process to be a manual task, requiring human intervention.
-
Navigate to the Processes section and select the process you created earlier (e.g., Quick Currency App).
-
In the process modeler view, locate the second step (it might be visually represented by a square or rectangle).
-
Click on the second step to open its properties menu. This might involve hovering over the step and clicking the "Settings" icon.
-
Within the properties menu, locate the option for setting the step type.
-
Change the type to Manual Task.
-
Under the Settings tab, locate the option Assign a manual task.
-
Write FX rate approval in the title
-
Then click the web interface, select Quick Currency App, select screen Validation and click on Confirm.
-
In the Assign To field, enter the following expression: ${P_initiator.login}.
Explanation: This expression uses a standard RunMyProcess global variable, P_initiator.login. This variable automatically retrieves the login name of the user who initiated the process, effectively assigning the approval task to them. By using this variable, you automatically assign the approval task to the person who started the FX rate conversion process.
The standard RunMyProcess global variables can be found in the user guide.
-
Check the box next to Notify via Email to send an email notification about the task.
-
From the Provider dropdown menu, select Subprojects.
-
Choose the Default Mail Server from the subproject options.
-
Click Confirm to save the provider selection.
-
Click Save to confirm the changes made to the Validation screen settings.
For more advanced email configuration, refer to the RunMyProcess user guide for setting up custom email providers (e.g., Gmail).
15. Import Connector to Retrieve FX Rate
We'll now import a connector to retrieve the daily euro exchange rate data from the European Central Bank (ECB).
-
From the RunMyProcess platform homepage, navigate to the Connectors section.
-
Locate the provider for the European Central Bank (ECB) within the list of available connectors.
-
Click on the small arrow or expansion symbol next to the European Central Bank provider to view its available connectors.
-
Find the Daily Euro Rate Exchange connector.
-
Click on the Actions icon (might be represented by ellipsis (...)) next to the connector.
-
From the menu, choose the option to Import the connector.
-
Recommended: Since you don't have a pre-existing ECB provider in your project, select the first option to import the provider along with the Daily Euro Rate Exchange connector.
-
A window might appear prompting you to select the project where you want to import the connector. Choose your project (e.g., Quick Currency App).
-
Click Confirm to finalize the import process.
We'll now import another connector to write the converted currency data to a Google Spreadsheet.
-
Assuming you're still in the Connectors section, locate the provider named RunMyProcess - CAPI Call within the list of connectors.
-
Click on the small arrow or expansion symbol next to the RunMyProcess - CAPI Call provider to view its available connectors.
-
Find the connector named Training 10 min Application - Add row in a spreadsheet.
-
Click on the Actions icon (might be represented by ellipsis (...)) next to the connector.
-
From the menu, choose the option to Import the connector.
-
Recommended: Since you likely don't have a pre-existing RunMyProcess - CAPI Call provider in your project, select the first option to import the provider along with the Training 10 min Application - Add row in a spreadsheet connector.
-
A window might appear prompting you to select the project where you want to import the connector. Choose your project (e.g., Quick Currency App).
-
Click Confirm to finalize the import process.
16. Set Up 1st Step to Retrieve FX Rate (Connector)
We'll now configure the first step in our process to use the imported Daily Euro Rate Exchange connector to retrieve the FX rate.
-
Navigate back to the process design tab within the RunMyProcess platform.
-
Click on the first step (which represents retrieving the FX rate) in your process model.
-
Click on the settings option to open the step properties.
-
From the properties menu, choose Connector as the step type.
-
In the Connector field, click on the dropdown menu.
-
Select the connector you imported earlier: Daily Euro Rate Exchange.
-
Click Confirm to save the selection.
Processing the Connector Output (JSON):
The connector will return a JSON object containing exchange rates for various currencies compared to 1 EUR. We need to extract the specific rate based on the user-selected currency.
Creating Outputs:
Within the step properties or the connector configuration, create two outputs for this step:
-
Output 1: Name: currency - Value: ${currency_value?upper_case} (This converts the user-selected currency value to uppercase)
-
Output 2: Name: fx_rate - Value: ${P_result.rate[currency]} (This extracts the exchange rate for the selected currency from the connector output (P_result) using the currency variable as the index.)
17. Set Up 3rd Step to Write Data to Google Sheet (Connector)
We'll now configure the third step in our process to use the imported Training 10 min Application - Add row in a spreadsheet connector to write the FX rate data to a Google Sheet.
-
Click on the third step (which represents writing data to the Google Sheet) in your process model.
-
Click on the settings option to open the step properties.
-
From the properties menu, choose Connector as the step type.
-
In the Connector field, click on the dropdown menu.
-
Select the connector you imported earlier: Training 10 min Application - Add row in a spreadsheet.
-
Click Confirm to save the selection.
Configuring Connector Input Variables:
The Google Sheets connector requires specific input variables to function. Click on the Input Variables section within the step properties.
Verify the values of the following input variables (or update them if needed):
-
P_mode: Set the value to ${P_mode}.
-
currency_value: Set the value to ${currency_value} (this provides the user-selected currency).
-
fx_rate: Set the value to ${fx_rate} (this provides the retrieved exchange rate).
Creating Output Variable (Optional):
Optionally, you can create an output variable to capture the data written to the spreadsheet for future reference.
- Create a new variable named spreadsheet_data with the value set to ${P_result}. (This captures the connector's output, which might be a confirmation message or the written data depending on the connector's functionality.)
18. Ready to Test Your FX Rate App!
Congratulations, you've configured your first RunMyProcess application to retrieve FX rates, obtain user approval, and write data to a Google Sheet. Now, let's test it out!
-
Accessing the Web Interface: Navigate to the Web Interface tab within the RunMyProcess platform.
-
Running the Interface: Click the Run Web Interface button. This will launch the user interface for your FX rate application in a separate window or tab.
-
Testing the Functionality:
-
In the web interface, select the desired currency from the available options.
-
Click the Submit button to initiate the process.
-
Expected Behavior: The application should:
-
Retrieve the exchange rate for the selected currency from the European Central Bank. Send an email notification to the initiator (the user who started the process) for approval.
-
Upon approval, write the FX rate data (currency, rate, and potentially username and date) to your designated Google Spreadsheet.
-
If you receive the email, locate the task link mentioned in the email content. Click on this link to access the approval task within the RunMyProcess platform.
-
-
Reviewing and Validating:
-
Once you access the task link, you'll likely see the retrieved FX rate for the selected currency.
-
Optional Review: You can review the displayed FX rate if you want to make sure it aligns with your expectations.
-
-
Completing the Approval:
- Click the Validate button to confirm the FX rate and proceed with writing the data to the Google Spreadsheet.
-
Verifying Spreadsheet Update:
- If your application is functioning correctly, a new row should be added to your designated Google Spreadsheet.. This row should contain your name (or username) along with the converted currency and FX rate.
To consult the test web interface in the future, open your project and click on the section Web Interfaces, select actions of the interface, then click Launch, select Last revision and Launch.
19. Debugging Your FX Rate Application with Process Reports
If you encounter issues with your FX Rate application, such as not receiving an email notification or missing data in the Google Sheet, you can utilize the RunMyProcess process reports to diagnose the problem.
-
Accessing Process Reports:
- Within the RunMyProcess platform, navigate to the Reports section.
-
Generating a Test Report:
- Select Process Report from the reports options.
- Click the Add button to create a new report.
-
Configuring the Report:
- In the report configuration, choose the Test mode (to analyze the latest process execution).
-
Running the Report:
- Click the Run Report button to initiate the process report generation.
-
Identifying Errors:
- The report will display a list of process requests. Errors will be indicated by red dots next to the corresponding request(s).
-
Consulting User Guide (Recommended):
- For detailed information on interpreting process reports and error messages, refer to the RunMyProcess user guide.. It will provide comprehensive guidance on troubleshooting various issues.
-
Investigating Errors:
- Click on the request with the red dot to delve deeper into the steps involved.
- The error message will be displayed at the bottom of the screen, providing specific details about the problem encountered during execution.
-
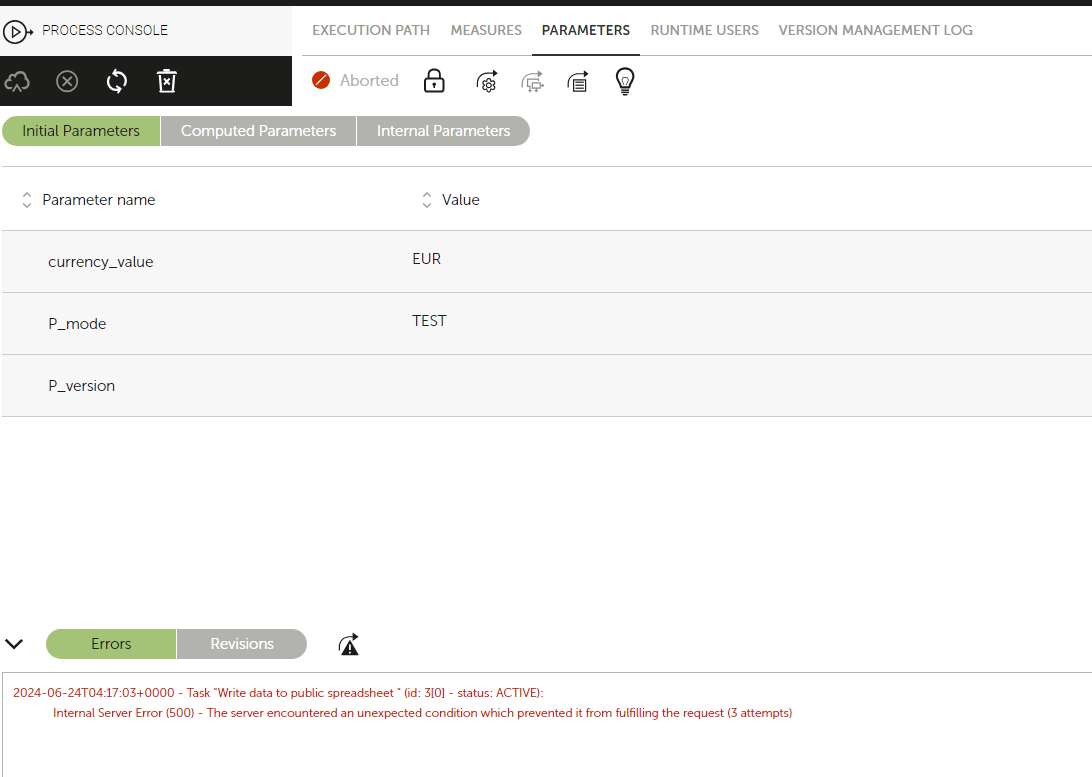
Understanding Process Parameters for Debugging with RunMyProcess Reports
The Parameters tab within the RunMyProcess process reports provides valuable information for debugging your FX Rate application. It allows you to examine the variables used and their values during process execution.
Types of Parameters:
Here's a breakdown of the different parameter categories you'll encounter:
-
Initial Parameters: These are the variables defined and sent to the process when it's launched. They represent the initial data used by the application.
-
Computed Parameters: These variables are calculated or modified during the process execution. Their values are dynamically generated based on user input, connector outputs, or calculations within the workflow.
-
Internal Parameters: These are special variables created and utilized internally by RunMyProcess during process execution. They typically manage the process flow and aren't directly accessible for modification.
Utilizing Parameter Values for Debugging:
-
P_result (result of a task): This parameter holds the output data from a specific task within the process. Examining its value can help you identify if a task completed successfully or if it encountered errors.
-
P_task (id of last task executed): This parameter indicates the most recent task executed in the process. It can be helpful in pinpointing where the process might have stalled or encountered an issue.
-
P_user (user who has performed the latest action on the process): This parameter reveals the user who last interacted with the process. This information might be relevant for tasks requiring user input or approval.
Troubleshooting with Parameter Values:
-
Error Analysis: If you're facing errors, analyzing the values of these parameters can provide clues about the issue's nature. For instance, an empty P_result for a specific task might signify that the task failed to retrieve data from the connector.
-
Process Overview: Even without encountering errors, examining the parameter values can offer a comprehensive overview of the process execution. By seeing how various parameters are populated and modified throughout the steps, you can gain a deeper understanding of your application's functionality.
Additional Tips:
-
When analyzing parameter values, consider the expected behavior of your application and the logic behind each step. Look for discrepancies between expected and actual values.
-
Combine the insights from parameter values with the error messages displayed in the process report for a more complete picture of potential problems.
-
If you're unsure about the purpose or interpretation of a specific parameter, refer to the RunMyProcess user guide or consult their support resources for clarification.
By effectively utilizing the Parameters tab within process reports, you can gain valuable insights into the behavior of your FX Rate application and efficiently troubleshoot any issues that may arise.
Congratulations! You've made your first RunMyProcess application!