Collections
This section contains basic information on collections, and guides you through the process of creating and using a collection. For more information on collections, refer to:
Introduction
A collection is a custom database which is created, populated, and managed in support of one or more applications. It can store any kind of data, for example, on customers, products, or assets. The data is created, used, and persisted in web interfaces and processes.
The storage engine used is MongoDB.
For an overview of the limitations which apply to collections, refer to Collection Limits.
If you need to use more collections and/or bigger objects, contact our support. You can always view the current size of a collection in the Collections tab of the project the collection belongs to.
Using Objects
The items stored in a collection are data structures consisting of field/value pairs similar to JSON objects. They can be represented in JSON format.
Example JSON object:
{
"base": "base1",
"author": {
    "email": "email1",
    "name": "name1"
    }
}
To create an object, you define a structured variable in your web interface or process. For example, if your web interface contains fields to define base, email, and name, the object can be created and stored in the collection.
Not all objects in a collection have to adopt the same structure, but it is recommended for performance reasons.
Using Aggregations
An aggregation is an operation that can be performed on a collection in order to obtain different calculations according to a certain data grouping defined by a pipeline stage.
You can use the following elements to build an aggregation:
- Aggregation pipeline stages
- $match: Filters data according to a specified set of fields in your collection.
- $group: Defines the keys of your grouping.
- $project: Defines the final fields you want to project in your result and their names.
- $sort: Sorts the result according to a specified set of fields.
- $limit: Limits the number of results.
- $skip: Skips to a given position in the result set.
- Aggregation pipeline operators
- $sum: Returns the sum of all the values of the specified field according to the grouping defined by the pipeline stage.
- $avg: Returns the average of all the values of the specified field according to the grouping defined by the pipeline stage.
- $min: Returns the minimum value of the specified field according to the grouping defined by the pipeline stage.
- $max: Returns the maximum value of the specified field according to the grouping defined by the pipeline stage.
Technically, an aggregation is defined as a set of pipelines:
[{pipepline1},{pipepline2},{pipepline3},{pipepline4}]
For details about aggregations, refer to the MongoDB documentation.
Aggregations can be applied directly to a collection report, or by using Freemarker or JavaScript.
For examples on how to perform an aggregation using Freemarker or JavaScript, refer to:
Creating a Collection
Before you can store or use data in a collection, you need to create and configure it.
To create a collection in DigitalSuite Studio, proceed as follows:
- Open the project for which you want to create the collection.
- Select Collections and click Add.
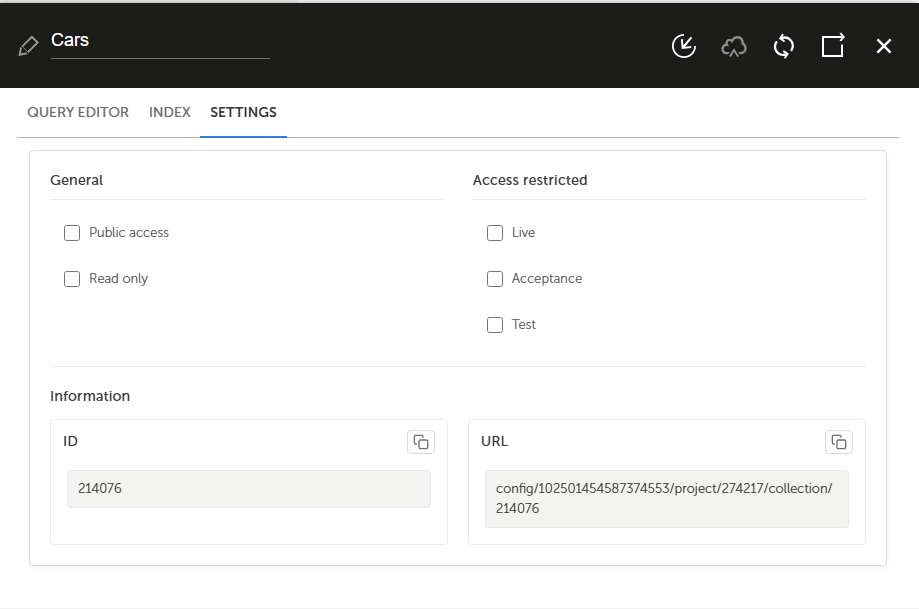
- Specify a name for the collection, for example,
cars. For collection names and identifiers, only use lowercase characters and underscores. - Configure the access to the collection. You can make the collection public or read-only, and restrict the access to the collection data to a specific execution mode. In this way, for example, Live data is not mixed with Test data. If you open a web interface in Live mode and retrieve objects from a collection, the source will be the Live collection data.
- Save the new collection which is still empty.
Operations on a Collection
This guide explains how to manage records in a collection, including adding, finding, updating, and deleting documents. Additionally, it highlights alternative methods to populate a collection.
Adding New Records
- Click the Create button to start adding new records.
- You can create a new document by copying an existing one. Simply click the 'Copy' button to use the selected document as a template for the new version.
- Enter the JSON data you wish to add to the documents.
Finding Documents
-
Fill the Find option with a proper query. Use the "Explain" button for guidance on query syntax and structure.
- Access additional filtering options by clicking "Options." Here, you can:
- Apply projections to include or exclude specific fields.
- Set sorting preferences for your query results.
Filtering Options
- Explain: Analyzes how MongoDB executes a query, providing insights into performance and optimization.
- Project: Specifies the fields to include in the query result.
- Offset: Skips the first N documents in the result set before returning the rest (default: 0).
- Sort Configuration: Determines the field used to sort the documents and defines the sorting direction for each selected field (ascending or descending).
-
Click Find to display records matching the query.
Updating Documents
- Provide the updated JSON object in the input field.
- You can update the document by copying an existing one. Simply click the 'Copy' button to use the selected document as a template for the new version.
- The update will apply to all documents matching the current query.
Deleting Documents
Delete documents that match the current query.
Alternative Methods to Populate a Collection
In addition to manual operations, you can populate a collection using the following methods:
- JavaScript methods in web interfaces
- Freemarker functions in processes
- Direct import of objects from a file in DigitalSuite Studio
- REST API calls from outside DigitalSuite
For further assistance, refer to the DigitalSuite documentation or contact support.
Importing Collection Data
You can import objects to a collection:
- from a CSV file by using a Freemarker function.
- from a file in JSON or BSON format in DigitalSuite Studio. Any file compliant to the standard JSON file format is valid for import. MongoDB recommends that you import data in BSON format. If you have a file in JSON format, you should thus generate an additional file in BSON format for the import. The file you want to import must have been uploaded to your project in DigitalSuite.
MongoDB does not support ACID database transactions, therefore a rollback is not possible. If your import fails, it is likely that your collection is in a partially constructed state. You should therefore make sure before the import that your import file complies with the correct file format. If the import fails, you are notified by email.
Example JSON file for the import:
    [
    {"phone_number":"123","lastname":"Tyson","firstname":"Mike","cars":[ "Ford", "BMW", "Fiat" ]},
    {"phone_number":"456","lastname":"Fowler","firstname":"Richard","cars":[ "Audi", "VW" ]}
    ]
While it is technically possible to import data to a collection on a running application or process, it is best practice to stop all activities on the collection before you perform an import operation.
To import collection data from a JSON or BSON file in DigitalSuite Studio, proceed as follows:
- Open the collection you want to import data to.
- Click Import and make the settings for importing the data.
- Select the source file and specify whether or not the file needs to be decompressed (from ZIP format).
- Click Import.
The data is not available instantly since the import operation is asynchronous. You are informed by email when the import is successfully completed, or in case of failure.
Exporting Collection Data
In DigitalSuite Studio, you can export collection data to a file in JSON or BSON format. The native storage format in MongoDB is BSON, the binary JSON format. BSON is also supported by the native MongoDB mongodump tool.
The main reasons for an export are:
- You need to transfer data between different execution modes, for example, from a Live version to a Test version, or vice versa.
- You want to save the collection data before performing an upgrade.
If you want to restore a collection to an external MongoDB, BSON is the format of your choice. BSON should also be used for backup/restore purposes within RunMyProcess DigitalSuite. If you want to post-process a collection via a script, however, you may prefer to use the JSON format.
To export collection data, proceed as follows:
- Open the collection you want to export.
- Click Export.
- Choose the execution mode for which the data is to be exported and the export format (JSON or BSON), and specify whether to compress the data to ZIP format.
The export operation is asynchronous. Depending on the size of the collection, it may take several minutes. After triggering the export, the platform acknowledges the request. Upon completion of the export, you receive an email with a link to the file storage of the parent project.
The file name has the following format: collection_{collectionId}_{mode}_{date}.{json|bson}.
Example:

Creating Indexes
Indexes enhance query performance by enabling faster searches within a collection. To create an index, follow these steps:
- Navigate to the Index tab.
- Click the Create Index button.
- Assign a unique name to the index.
- Optionally, configure the index as unique and/or ascending based on your needs.
- Select the property or properties to include in the index by clicking the Add button.
- Click Create to finalize the index.
The list of all available indexes will be displayed below, including the default _id index, which cannot be deleted.
To remove an index, click the Delete icon located on the right side of the respective index entry.
Collection Settings
To manage collection access rights, follow these steps:
- Navigate to the Settings tab.
- Update access permissions as needed.
Collection Statistics
To review the usage statistics of a collection:
- Go to the Query Editor tab.
- Click the More Info button.
- A pop-up will appear, providing detailed information about the collection's usage.

Accessing Collections
Collections can be accessed:
- from web interfaces by using a collection report (see below) or JavaScript methods.
- from processes using Freemarker functions.
Creating a Collection Report
To display the content of your collection in a web interface, you use the Collection Report widget.
To create a web interface for displaying collection data, proceed as follows:
- Create a new web interface.
- Add a Collection Report widget to the Launch screen and choose the collection to be used as the basis for the report.
-
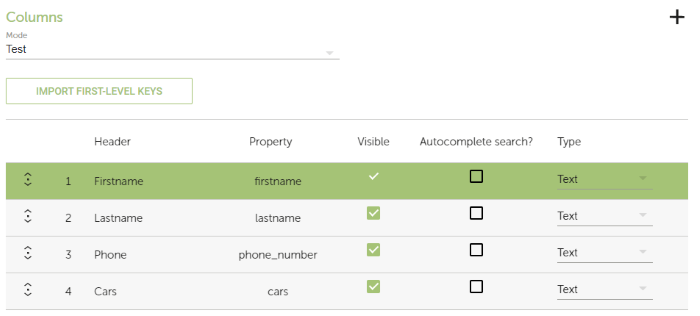
Click IMPORT FIRST-LEVEL KEYS, and configure the report columns. The property names specified must correspond to the keys defined in the collection. The sample collection created and populated as described under Importing Collection Data above would be shown as follows:
-
Save your web interface and run it for testing:

Sample Application
To show all expenses requested in the Expense Request sample application, you can create a collection report:
- Create a web interface named
Sample – Report – All Expenses. - Add a Collection Report widget to the Launch screen, and choose the
sample_expensescollection which you have created for the Sample Expense Request project. -
Configure the report columns according to the data defined in the
sample_expensescollection: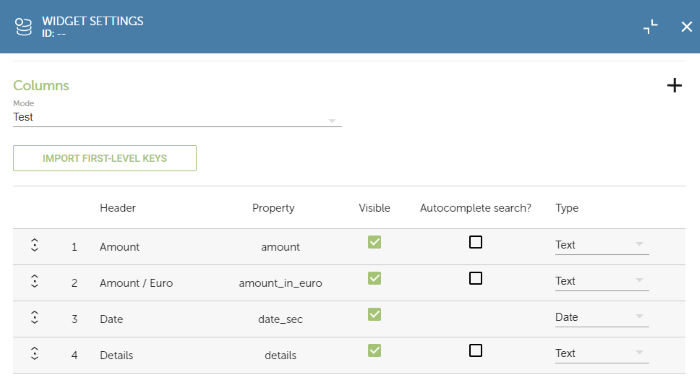
-
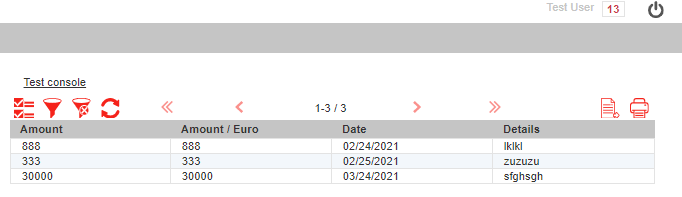
Save the web interface and run it for testing:
For details about the Expense Request sample application, refer to the Overview.
Enable help
To enable form assistance, click the help icon located in the top-right corner of the interface.