App Translator
The App Translator is an application designed to manage the translation of DigitalSuite applications. It allows authorized users to efficiently create and manage translations in various languages. The application uses logical dictionaries, with translation keys automatically generated to streamline the process and maintain consistency across different languages.

Glossary of common terms
- Environment: A specific revision of an application, consisting of three key elements: Project, Version, and Web Interface or Process. Each environment can have one or more associated dictionaries for translation.
- Dictionary: A collection of translations for an application’s elements within a specific environment and language.
- Designer Dictionary: The default dictionary created automatically from the design of a web interface or process. It serves as the base reference for creating new translations in other languages.
- Entry: An individual element that requires translation. Entries are displayed in a table format for each dictionary within a selected environment.
- Reference Dictionary: A read-only column in the entries table, used as a guide to simplify the translation process by providing a reference for the original language.
- Dictionary to Edit: An editable column that allows users to modify or add translations for each entry in the selected dictionary. Empty Template: A dictionary with no pre-existing translations. It can be used as a blank template when creating a new dictionary.
Overview
When developing an application on the DigitalSuite platform, a key consideration is: How can I make my application accessible to users in different regions who speak different languages? In other words, how can I internationalize my application?
The App Translator application provides a solution by allowing you to translate your DigitalSuite applications into various languages, ensuring that users can view web interfaces in their preferred language. With this tool, you can effectively manage translations for different environments within your account. Using dictionaries, you can display, create, edit, delete, or import translations for any application.
Note: To internationalize an application, it must first be included in a project version. If it is not included in a project version, it will not belong to any environment and cannot be translated.
Once your application is included in a project version, you can create dictionaries to handle its translations.
How does it work?
The DigitalSuite platform allows you to create web interfaces that can be used to launch processes or serve as manual tasks. These web interfaces are built with configurable widgets, where each widget requires specific settings such as an ID, label, validation messages, and more, depending on its type.
The App Translator enables the translation of these configuration values—such as labels and validation messages—into different dictionaries, allowing end users to interact with the application in their preferred language. This process is known as the internationalization of an application.
Requirements for Internationalization
To internationalize an application, the following conditions must be met:
- Include the application in a project's version: The application must be added to a project version for it to belong to an environment and be eligible for translation.
- Assign IDs to widgets: Each widget in the application must have a unique ID for translation purposes.
- Authorized user profile: You need the appropriate authorization to access and use the App Translator application.
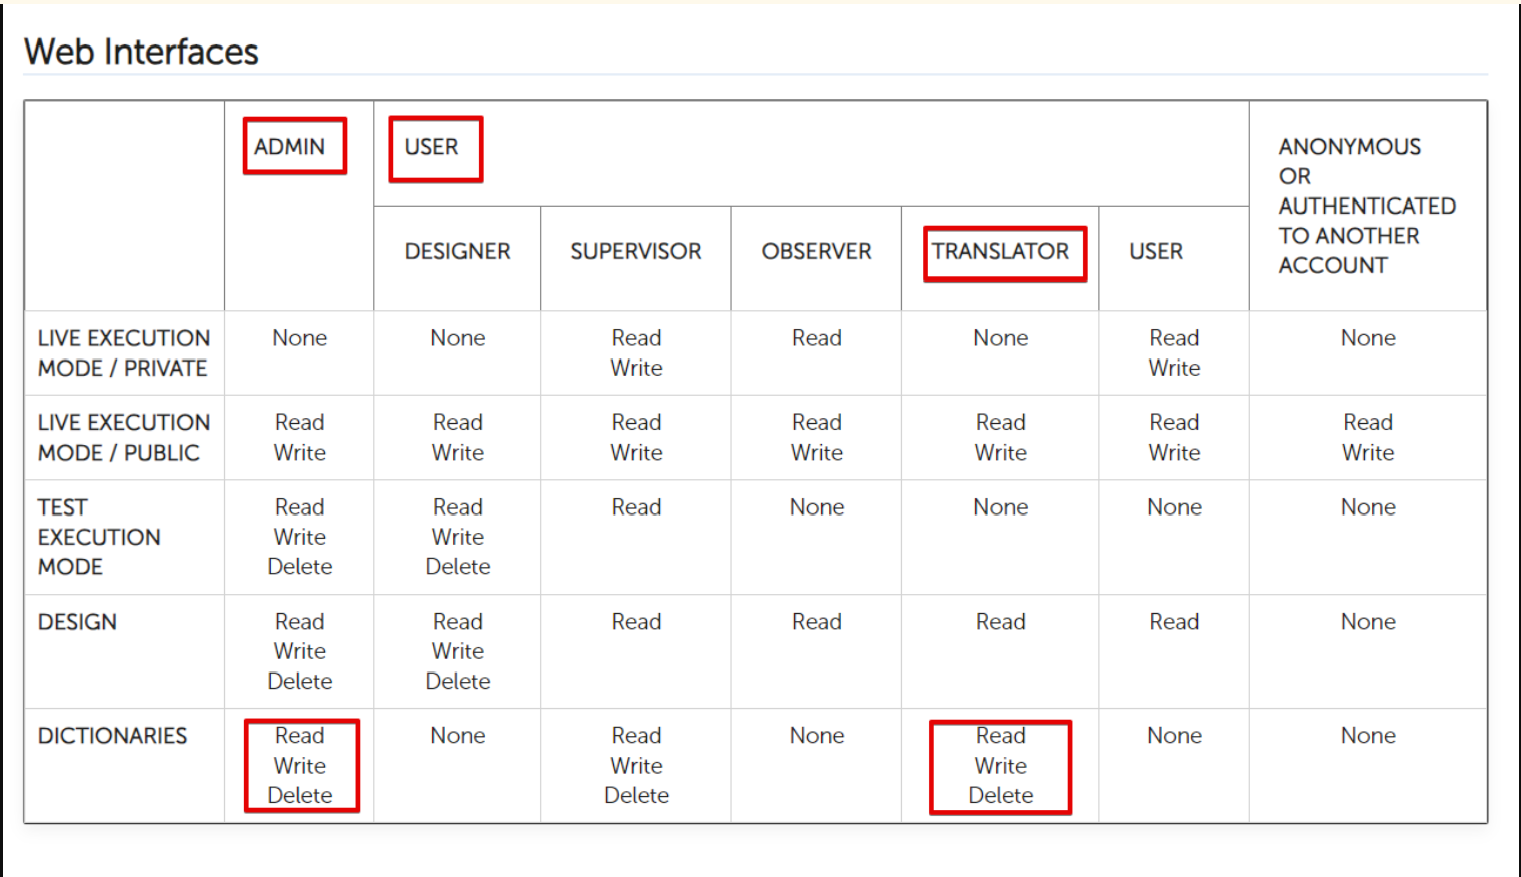
Note: The USER Profile Role must be included in the Role assigned to Translator access rights type on the project that contain the Web Interface you would like to translate
Internationalizing Non-Widget Text
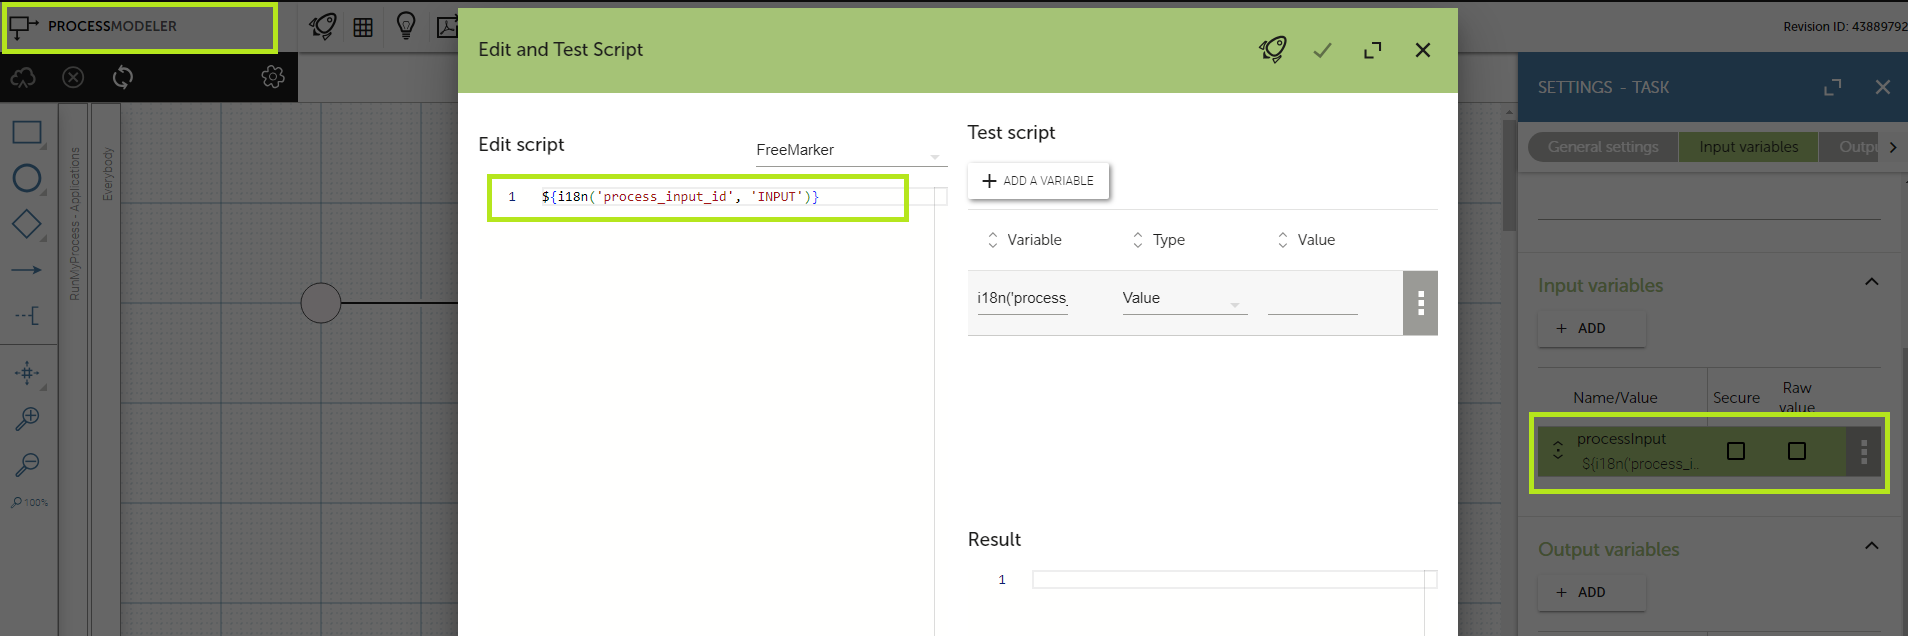
Sometimes, you may need to translate text that is not part of a widget’s configuration, such as dynamic field labels or text within JavaScript scripts. To do this, use the following FreeMarker method to create a new key in the Designer Dictionary:
${i18n('text_id', 'value')}
text_id: The key that identifies the text to be translated.value: The default text that will appear in the Designer Dictionary.
This method is also useful for translating emails sent by processes.
Handling Quotes in JavaScript Translations
When internationalizing text in JavaScript, be mindful of the possibility of translated text containing quoted words, as this can cause errors. For example, an apostrophe in the translated text can conflict with string delimiters in JavaScript. To avoid this issue, use the P_quoted function provided by DigitalSuite. This function ensures that quotes within the text are properly interpreted by the JavaScript interpreter.
Here’s an example of how to use it:
${ P_quoted( i18n('tx_toolbox', 'User settings') ) };
In this example, the French translation, "réglages de l'utilisateur", contains an apostrophe. Without the P_quoted function, this would result in an error. Therefore, it’s good practice to use P_quoted whenever translating dynamic text in JavaScript to prevent issues with quoted characters.
Choosing an environment and displaying a dictionary
When you open the App Translator, the first step is to select an environment for your translation tasks. To do this, you’ll interact with three dropdown lists:
- Project
- Version
- Web Interface or Process
Initially, only the Project list is available. The button bar, which allows you to manage dictionaries, will remain disabled until a valid environment is selected.
- Select a Project: Once you select a project, the Version list will be populated with all available versions for that project.
- Select a Version: After choosing a version, the Web Interface or Process list will update to display the web interfaces or processes linked to the selected version.
- Select a Web Interface or Process: After making a valid selection in all three dropdown lists, a table will appear, displaying the following columns:
Dictionary Table Columns
-
Reference Dictionary (Read-Only):
This column displays the Designer Dictionary by default, which is generated automatically based on the design of the application. For web interfaces, each entry in the table corresponds to a widget’s configuration field or a key created using the App Translator FreeMarker method.
- If additional dictionaries have been set up, a dropdown list will appear in the column header, allowing you to choose a different dictionary to use as a reference.
-
Dictionary to Edit (Editable):
This column is where you input or modify translations for each entry. If existing dictionaries are configured for the application, they will be available in the dropdown list at the column header. You can select one to view and edit the translations.
- If no dictionary exists, you will need to create one before editing translations in this column.
-
Entry ID (Read-Only):
This column shows the ID of each entry, providing a secondary reference to simplify the translation process.
-
Entry Source (Read-Only):
This column displays the source of the entry, such as Widget, Menu, Basket, Custom, or Application Information. This helps in identifying where each entry originates, aiding the translation process.
Create a Dictionary
To create a new dictionary, click the "+" button. The "+" button is located in the button bar and becomes available once an environment is selected. Clicking this button will open a popup window where you can configure the details of your new dictionary.
Dictionary Configuration Options
In the popup window, you’ll need to provide the following details:
-
Dictionary Language:
This dropdown contains all available languages for creating a dictionary. Select one from the list. If a language has already been used for another existing dictionary, it will not appear in the list as an option.
-
Dictionary Name: You can provide a custom name for your dictionary, which helps in identifying it later.
-
Template:
Two options are available for creating the dictionary:
-
Empty:
Selecting this option will create a dictionary without any prefilled translations, leaving the value for each entry empty.
-
Copy From:
If you choose this option, four additional fields will appear, allowing you to select the source environment from which the dictionary should be copied. The new dictionary will be generated by matching entry IDs from the source dictionary. If an entry has no translation in the source dictionary, the new dictionary will use the translation from the Designer Dictionary by default.
This feature is useful when dealing with different revisions of an application across various versions.
-
Once you’ve filled in all the fields, the Create button will be activated. Click this button to create the dictionary and start editing its translations.
Managing the existing dictionaries
Once an application has dictionaries, several features are available to manage them effectively. You can edit, save, delete, and reload dictionaries as needed.
Editing and Saving Dictionaries
To edit a dictionary:
- Select a Dictionary: Choose the desired environment and dictionary from the column labeled Dictionary to Edit.
- Make Changes: Type directly into the entry fields to modify or add a new translation. Any modified entry will be highlighted with a border.
- Save Changes Manually: Modifications are not saved automatically. You must explicitly save your changes by clicking the Save button in the button bar.
- Confirm the Action: A confirmation prompt will appear to ensure you want to save the modifications, as changes cannot be undone after saving.
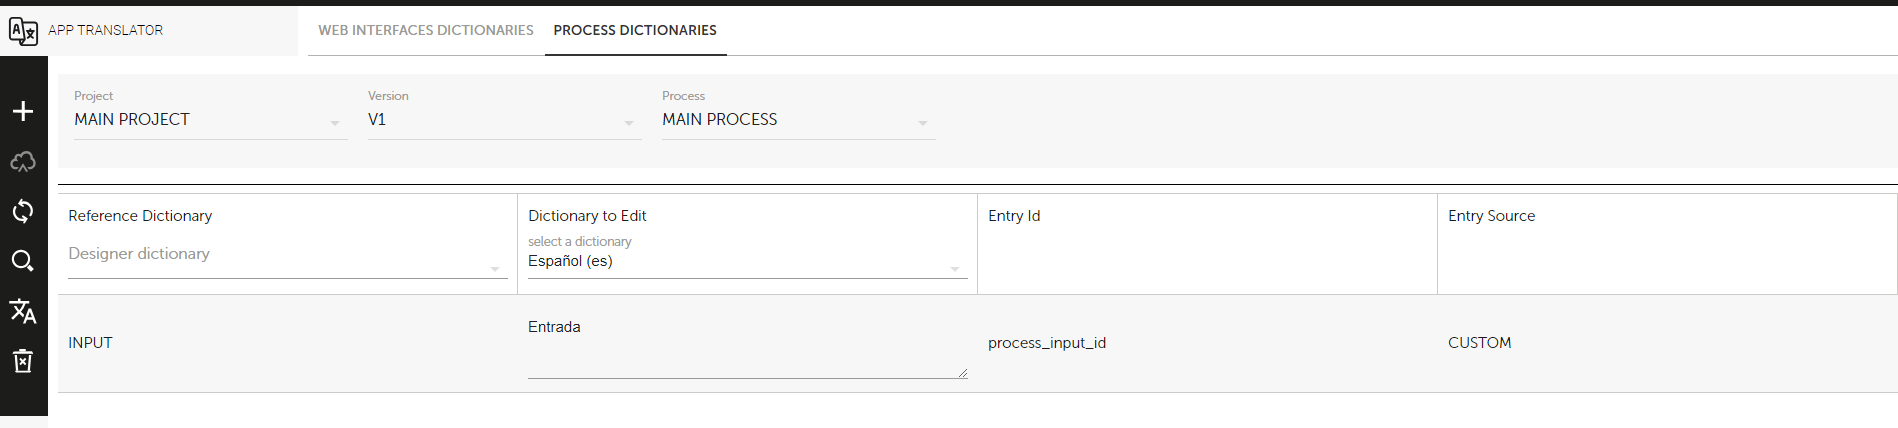
All the previous steps apply to the Process Dictionaries. The entryes will be defined by ${i18n('text_id', 'value')} function
Deleting a Dictionary
To delete a dictionary:
- Select the Environment and Dictionary: Choose the environment of the dictionary you want to delete, and select the dictionary in the Dictionary to Edit column.
- Click the Delete Button: Once selected, the Delete button in the button bar will be activated. Click it to delete the dictionary.
- Confirm the Deletion: A confirmation window will appear. Note that deleting a dictionary is irreversible.
Reloading an Environment
To reload the dictionaries for a selected environment:
- Click the Reload Button: Found in the button bar, this button allows you to reload the dictionary lists.
- Confirm the Action: If any unsaved changes are detected, a confirmation window will appear. If you proceed, the dictionaries will be reloaded, and all unsaved changes will be lost. This action cannot be undone.
Additional features
To make the translation process more efficient, the App Translator offers two additional tools: Find and Replace and the Batch Translation Tool.
1. Find and Replace
This tool helps you search for specific values in the Dictionary to Edit column and replace them if necessary. To access this feature, click the find icon in the button bar.
How to Use:
- Find a Value: Enter a value in the "Find" field to search the Dictionary to Edit column. Once you provide a value, the buttons will be enabled.
- Find and Replace: This will highlight the first occurrence of the searched value. If clicked again, the value will be replaced by what you provide in the "Replace" field. If no replacement value is entered, the field will be emptied.
- Previous and Next: These buttons allow you to navigate through the column, highlighting entries that match the search criteria. These work for search purposes only and do not perform replacements. However, if you click the Replace button, the selected entry will be replaced with the "Replace" field value.
- Cancel: To close this options, click the find icon again.
Key Features:
- Match Case: The find function searches for any entries containing the provided text. Check this option if you want the search to be case sensitive.
- Match Entire Cell content: Check this option if you want an exact match criteria.
- Replace All: Allows you to replace all occurrences found without confirmation. This will perform the search across the entire column and replace all matched entries in the dictionary.
2. Batch Translation Tool
This tool is designed for bulk translation of recurring phrases. It is particularly useful when creating a dictionary from an empty template, allowing you to populate translations quickly.
How to Use:
- Click the translation icon in the button bar to open the tool.
- In the From field, enter the text you want to search for in the Reference Dictionary. Unlike the Find and Replace tool, this tool requires an exact match for the provided value.
- In the To field, enter the text you want to set as the translation in the Dictionary to Edit. You can leave this field empty if you wish to clear values.
- Once both fields are filled, the Translate button will activate. Clicking it will perform the batch translation, replacing all occurrences of the searched text in the dictionary to edit.
3. AI Translate
The AI Translate feature is a powerful tool designed to streamline the process of translating an entire dictionary in bulk using an advanced AI translation service. This tool is particularly useful when building a dictionary from scratch or enhancing an existing one by filling in blank entries or replacing all entries with AI-generated translations.
How to Use AI Translate
1. Select the Reference Dictionary
- Choose the dictionary you want to use as the source for reference during the translation process.
2. Choose the Target Dictionary
- If you already have a dictionary to edit, select it.
- Alternatively, create a new dictionary to populate with translations.
3. Activate AI Translate
- Click on the AI Translate button in the toolbar.
4. Set Translation Preferences
- Decide whether to replace existing entries:
- Replace all manual entries: Overwrite existing translations with AI-generated results.
- Don’t replace manual entries: Only populate empty entries.
5. Confirm and Start Translation
- Click the Proceed button to begin the process.
6. Review Results
- Once completed, all dictionary entries will be populated with the AI-generated translations.
This process ensures fast, consistent, and accurate translations for your dictionary-building needs.
Testing
You can test and verify your dictionaries by opening the web interfaces in the version where the dictionary was created. A language selection drop-down will appear, allowing you to choose the corresponding language for the web interface. This ensures that the translations from the dictionary are displayed properly for end users.